Showing posts with label lake quilt. Show all posts

Tuesday, March 10, 2020

Leftovers (and Some News)

Last month I took a break from landscape quilting (although there's some news regarding landscapes further below) and pulled out all my batik strips...leftovers from years and years of making quilt binding. A printed batik was pulled from the stash to make borders. The resulting quilt is 75" x 66".


I also pieced a lot of the smaller leftovers into piano key borders....


...which I'd planned to include in the back of the quilt. That didn't happen, but I'll use these at a later time.

Instead, I made the quilt "reversible" by piecing completely different fabrics for the back. This is a good way to use up yardage stash.


It's on the couch now, batik side up, and I can switch to this other side when the mood strikes.

************************************************************

Some news on the landscape front, as promised above...my landscape quilt Still Waters was chosen to be included in this Spring's issue of Art Quilting Studio magazine! I am thrilled to be in the company of so many wonderful quilt artists again, and as I've mentioned before, this magazine coincidentally has been my favorite quilt publication since long before they ever published any of my work.

(Click on any photo to enlarge.)
 Stampington Publications did an absolutely beautiful job of photographing the quilt. I couldn't be happier or more grateful.


Here's the cover of the issue, out on stands now through May.


For information on the making of Still Waters, check out this old blog post and older ones leading up to it.

Signing off for now. Happy Spring (or Fall, depending on what hemisphere you're in)!

Linda

Thursday, August 27, 2015

All is Fair

This week another tree was thread painted, again using the method from Nancy Prince's book, Thread Painting with Style, with two layers of tulle sandwiched between two layers of water-soluble stabilizer. (I almost typed 'fertilizer.' What the...?!)


It's a fair effort, not great, but hopefully each time they'll turn out a little better. Still don't know if I'll use this tree, along with the first two, for The Overlook quilt. If not, they'll likely turn up in a future quilt.

Not to mix fall with spring, but earlier this week there was some good news from the Kentucky State Fair. I had recently retrieved a finished quilt from the closet, figured out how to bury the remaining knots on the back, and taken a shot at entering it in the 2015 competition, since this state fair has used professional quilt judges in recent years and they give feedback. Thanks to Bobbie Gross for taking the photo and sending it to me.

Still Waters, 2013
For details and challenges of making this quilt, see blog entries dated June 27, 2013 through September 21, 2013. The Sept. 21 blog (linked) shows several 'before' and 'after' closeups.

That's it for this week. (Actually another sweater went into the Lucy drawer, but my good camera is out on loan, so I'll share a photo of the sweater another time.)

Linking up with Whoop Whoop Fridays. Sarah has a winner for the giveaway, and has made some very pretty coasters.

Have a wonderful weekend!

Linda

Saturday, September 28, 2013

Stews and Brews

Happy autumn!

I started this first, blissfully temperate week of the season by giving the lake quilt a title (Still Waters) and making and attaching a sleeve and a label. Then it was time to figure out where and how to store it until it's sold.


So, on to the next project. I had been working on a beach scene with some funky palm trees, but here's where they are at the moment--in pieces, waiting for re-piecing and fusing.


And I'm just not feeling it right now. I think it will happen, but something else has been brewing on the creative burner for a while, and it feels like time to turn up the heat. It started with a photo of me that my husband took in February on Lookout Mountain in Tennessee.


In my imagination, this industrial-strength railing was gone. (Do you remember the days when historical landmarks had no railings? I do, because I'm no spring chicken, as you can see in the photo. But apparently these days we need protection from some insane contemporary urge to hurl ourselves off high places. Personally, I always maintained a healthy distance from edges like this, and my family and friends were kind enough not to push me over.)

Also in my imagination, a young lady hurried down the flagstone path (no concrete sidewalks in my head) toward this garrison, and she was dressed in something from well before before the Civil War. Long story short, she was a Medieval chick, and this garrison was part of a castle somewhere in old England. I don't care if the terrain and trees aren't quite authentic for that part of the globe...when it's your quilt, you get to make it your world! So a few months ago, I went online and looked at sites with free stock photos, and found this one...


...and pasted her (minus the log and surrounding greenery) over me in that photo. Then I proceeded to obliterate the railing, bit by bit, by cloning nearby parts of the forest and pasting them over it.

Today I digitally manipulated the photo so that just the main outlines and shadows were visible in a stark black-and-white version, and printed it out in 4x4 poster mode (16 printer pages).


Then the work began, cutting off the margins and matching up the pages and taping them together to get a roughly 32" x 40" photo.


At least I thought that was work. The real work began with the freezer paper overlay. Tracing solid lines from this etchy-sketchy, shadow/highlight photo (and no lightbox) proved to be somewhat challenging. After two hours of tracing (and a fair amount of erasing) I left it sitting and will resume tomorrow.


So that's it for this week, except to say that Wednesday my husband and I tried an incredibly delicious Oktoberfest Stew recipe that my daughter-in-law had found on Pinterest. We scarfed it in two days. If you like that sort of thing, head for http://thecozyapron.com/oktoberfest-stew-and-shiny-happy-people/. But don't do it until you check out Leah Day's FMQ Friday post and look at the reader hookups there. And if you have a blog about free-motion quilting, please consider hooking up there if you haven't already and sharing what you're up to (it's easy; instructions are near the bottom of the page). I don't know about you, but my greatest inspiration comes from seeing what other people are doing. And it's a good excuse to sit and enjoy a cup of coffee (or a glass of wine ;).

Enjoy the season!

Friday, September 13, 2013

Coming into Home Stretch

Lots of progress on the lake quilt this week. Tomorrow it comes to a halt as I head out of town again, this time to TN to visit my mom. After that it's off to the Bourbon Festival in Bardstown, KY, and then hopefully I'll be back in the studio to finish this up. In the meantime, here's what got done:

1. Quilted the geese. Mostly just outlined their major areas in a free-motion satin-stitch so that their bodies would puff out a bit and look more dimensional.


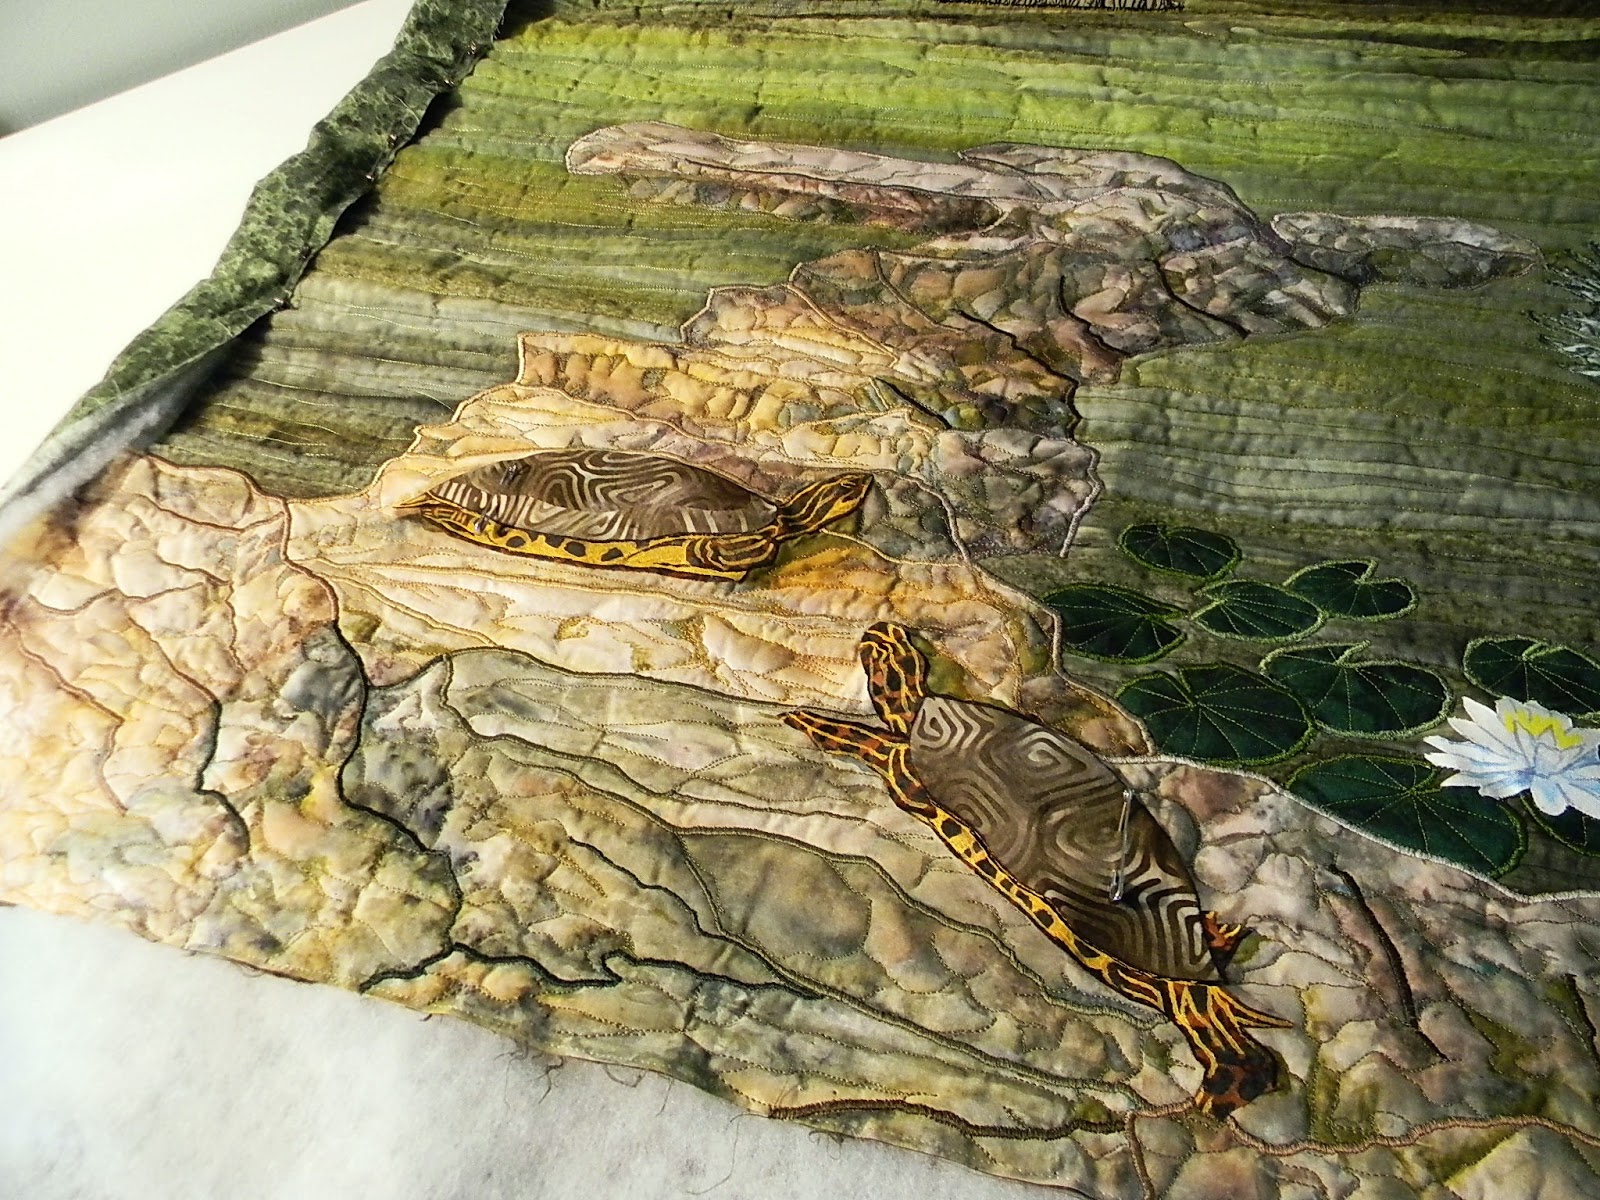
2. Quilted the turtles. Gotta admit I wasn't looking forward to this, but they turned out to be more fun than challenging, although there was definitely a 'learning curve.' For them, I used a combination of free-motion satin-stitch and free-motion straight-stitch. With the first turtle, I had to break thread roughly 8 times as I kept working myself into areas I couldn't easily get out of. With the second turtle, it was one continuous thread, start to finish, no breaks. At that point I was pumped enough to do a third one! Alas, there are but two...


3. Quilted this frog.


Just kidding. We found this little guy yesterday on the porcelain-berry vine in the back yard. He was only 1-1/4 inches long, and turned green as soon as my husband picked him up. He's called a grey tree frog. I love frogs. Ok, back to quilting:

4. Time to steam-block the quilt. Tools: carpeted floor, flannel-back vinyl table cloth (flannel side up), old cotton sheet, quilt face-down, lots of T-pins, press cloth, spray bottle of water, and iron. This photo was taken just after the quilt was blocked (took about an hour after pinning). After that, it lay untouched overnight, until there was no question it was dry. And what a difference. I always forget just how much smoother and better these wall quilts look after they're steamed and dried. Blocking 'marries' the quilt layers without flattening them (hold the iron just grazing the backing; do not set its full weight down on the quilt!!), shrinks out any warping, and makes it far less likely that those buried knots will ever work their way out. 


5. Time to square. Pinned the blocked, dry quilt back up on the design wall. And suddenly it hit me that I could use a plumb bob to get a true vertical line. I'm sure people do this all the time, but I never had a design wall until this quilt, so the idea had never occurred to me. Wow, what a timesaver!


See the string hanging from the flower pin? That's just a paper clip (not the old wire kind) clamped onto the bottom end of the string. This (the string plus the clip) is a makeshift plumb bob. The paper clip is heavy enough to pull the string into a straight (plumb) line. When the paper clip stops swinging around in the air currents caused by your window air conditioner, your pedestal fan and your ceiling fan, you can get your true vertical line and mark it on the quilt! (And yes, I had to turn off the window unit, pedestal fan and ceiling fan--one by one. That darned paper clip didn't stop moving until all three were off and the air was perfectly still. Hey--ding ding ding--here's an idea: Maybe I should have used a bigger paper clip. Duh.

Oh well, next time. :)

Anyway, the quilt is now squared and trimmed, and binding strips have been cut. I'll save that photo for next time.

Now it's time to sign off and do the fifth load of laundry. Why do I always think I can save all the chores until the last day before a trip? Hooking up with Leah Day's FMQ Friday post--she's teaching her husband to stitch free-motion--is this cool, or what??? (Wait, do we really want our spouses in our spaces? I might have to think twice about that... ;) Anyway, his first free-motion attempt is pretty impressive. Also hooking up with Sarah Craig's Whoop Whoop Fridays post, where she has got a clean house this week (I'm SO jealous, but yes, now and then it just has to be done) and is generously sharing other folks' work instead of her own.

Have a good weekend, everyone, and if you're having 75 degree weather like we are today, take a break from quilting and get outdoors!

Linda

Friday, September 6, 2013

Putting Myself on Notice

While continuing work on the lake quilt this week, I noticed a potential problem. Do you see it?


See the dark part of the turtle's foot near the bottom edge of the quilt? Notice how close it is to the edge. It suddenly occurred to me that, by the time the bottom edge gets squared and trimmed and the binding gets sewn on, at least part of the turtle's foot will probably be under the binding. Why had I not noticed this before???

As I stood there in disbelief and speculated--because I'm nothing if not analytical (*snicker*: notice the first four letters of that word)--I wondered if, before the rock fabric got quilted and satin-stitched, there might have been more space between the turtle's foot and the bottom edge....

Hmmm. So I looked back at an old photo of the quilt top, taken before any quilting was done:

 
And there it was. The turtle's foot actually started out just enough above the edge that its proximity didn't get my attention--but the 'drawing up' of the fabric during quilting had now brought it close enough to be an issue.
 
So, what to do? I could border the quilt--which I'd had no intention of doing--however, I didn't leave enough backing fabric and batting around the edges of the quilt top to do that.
 
Except at the bottom. AHA!! A light bulb flashed on in my head. Could I attach a border at the bottom, alone--no sides or top? Ehhhh, maybe not. Depending on the color, it would probably end up looking like some weird fenceboard or dirt road or patch of grass...wait...a patch of grass? No, that would look too 'manicured' for such a natural setting, but what about a hedge? Nah. Again, too manicured. Ok, what about a patch of groundcover, which you see in nature all the time? My clover fabric is the right scale, but it seems much more suited for a meadow than for a lake scene. I hunted for some fern fabric, but found only little bitty ferns--which in the foreground would have skewed the quilt's perspective.
 
On my fifth foray into the stash, out came a piece of fabric I'd thought might never get used--a yard (the minimum cut allowed when I bought it at Eleanor Burns' tent sale at the 2012 Paducah Quilt Show) of big ol' caladium leaves. That's right, caladium leaves. I know...crazy, huh? Do caladiums even grow in the wild? They probably do somewhere...doesn't everything? At this point, I almost didn't care. 
 
 
And wonder of wonders, they worked--at least, visually. In fact, they made the quilt pop. As any quilter will know, that was what sold me. Suddenly the yellow-green in the middle section of water became more obvious. Why? Because of all that yellow-green in the caladium leaves! It balanced the quilt and gave it a finish I wasn't even aware it needed. Just cover the caladium leaves up in this next photo, and you'll probably see what I mean.


So, it turns out I did myself two favors, however unintentional. By placing the turtle too close to the edge, I was forced to add a foreground that (I think) improved the overall landscape--and I had serendipitously included enough batting and backing on the bottom edge to do that very thing. Big, big WHEW.
 
After quilting the caladium leaves yesterday, I took a break and re-auditioned some fabrics with my funky palm trees. Remember this first, not-so-successful audition from last week's post?


Ok, on to the second attempt, below. I like this much better, but we'll see. Going to have to live with it for a few days first. (Notice I'm paying more attention to the space between major elements and quilt-top edges. Lesson learned. :)
 
 
Heading over to Leah Day's FMQ Friday to see what she's up to today, and to Sarah Craig's Whoop Whoop Friday. These two gals and their reader hookups always give me an infusion of creative energy. They'll probably do the same for you, so check them out.
 
Which reminds me--this has been mentioned before, but it's worth saying again--there are a lot of those wonderful reader hookup blogs I've visited and tried to comment on, but for some reason, on many of them, my comments never show up. My daughter-in-law has had the same problem with my blog: she comments, but it never comes through. If any of you know why this is happening, please give me a heads-up in a comment on this blog. If you don't see it come up within a couple of days, then you may be having the same problem. :(
 
Have a great weekend, everyone. Just two weeks until fall--my favorite season! :))
 
Linda

Friday, August 30, 2013

Rocks in My Head

Making some progress on the lake quilt, although for anyone but me, it may be hard to tell.


Quilting the rocks in the foreground turned into a major undertaking after I decided they needed more delineation. I don't even want to guess how much time was spent just sitting and staring at the quilt, trying to figure out where the rock formation lines (the free-motion, satin-stitched ones) should be. And the longer I stared, the more the formations shifted in my perception, making it almost impossible to settle on definite stitching lines. I wanted to throw my hands up in the air and jump into this darned lake! Even after stitching, some of the lines had to be ripped out and repositioned because they didn't look as natural as I'd imagined they would. The good news is, if you're going to rip stitches, satin stitch, even a free-motion one, is about as easy as it gets.

Here is a closeup of the area I finished this morning. (The poor turtles are still waiting to be quilted. Let's hope they can keep their paint on through all the handling. So far, so good.)


At times during these last two weeks, a break was much needed, so I finished the baby afghan I'd started in Wyoming.


But the baby (my great-niece, Chloe) is not going to get this, after all. Why? Because in my determination to make the afghan soft and cuddly, I kept my tension deliberately loose, and by the time the last row was hooked, my tension had become so loose that the end of the afghan was nearly a foot wider than my beginning chain--even though my beginning chain was made with a hook 2 sizes larger to ensure against that possibility. Now, I'm no novice at crochet, so I know better than to pull a stunt like this! Instead of trusting myself to keep an unnatural tension consistent throughout, I should simply have used a larger hook for the whole afghan and worked with my normal tension. Duh. Apparently I still had rocks in my head!

Wednesday was better because the UPS man brought me these beautiful batiks (isn't he nice?):


And because I found this little treasure at JoAnn Fabrics (speaking of yarn):

 
OH.  YEAH. 
 
Yesterday was good, but not because of quilting. Took the day off and went to the Frazier History Museum here in Louisville with my good buddy Connie. We had a wonderful time, and we learned how to sword fight. NOT. But the demonstration was really cool.
 
Closing here with a photo I took today of Zoe--a different kind of tortoiseshell than what you see in the lake quilt above (actually, those aren't tortoises, but I needed a segue here). Zoe is our (mostly) Norwegian Forest cat. Napping away, she was oblivious to the fact that the prism in the window had cast this intensely colored light right across her tail. Awake, this would have perturbed her at the very least; asleep, it just made for a cool shot. 


Everyone have a great week. The kids are back in school now (mine are grown and out, so no change here), and I'm guessing a lot of quilters will be going full speed ahead now with projects that may have languished somewhat in the heat and busy-ness of summer vacation. Looking forward to seeing an increasing number of reader hookups at two of my favorite Friday blogs, Leah Day's FMQ Friday and Sarah Craig's Whoop Whoop Fridays. Check out their latest posts and their awesome reader hookups when you have a moment. Enjoy!

Linda