Sunday, December 7, 2014

Cloth and Broth

During the last month, there has been a lot of knitting going on for our first grandbaby, Lucy--who is due in 3 months! No photos of the knitted items yet, but there will be eventually. (Still trying to keep those projects secret from Lucy's mommy.  :)

And on that note, shortly before Thanksgiving, the twin-size 'top-secret' quilt top for Lucy received its finishing touches. At that point it hit me that, for a couple of reasons I'll explain in a later post, this can't be quilted as originally planned--which was an overall, large-scale serpentine-line pattern on both diagonals. So, it was back to the drawing board...literally. After printing a black-and-white photo (why waste color ink?) of the quilt on regular 8-1/2 x 11 printer paper on 'poster' setting for 2 x 2 sheets, I taped them together and clipped them onto a drawing board, then laid a piece of clear vinyl on top.


Drawing on it with dry-erase markers, I outlined certain elements for echo-quilting, then very roughly sketched some general stitch designs to fill in the border and the open areas. It will probably change, but at least now there is some direction to what at first seemed an intimidating prospect.

Then for a fun break I started another 'ghost quilt.' (See the first one at this link.) Finished this second one today (roughly the same size as the first one):


On Monday it was 'out of the studio and back into the kitchen,' where the carcass of our Thanksgiving turkey, plus the legs and thighs, went into a 16-quart stock pot along with lots of veggies and herbs...


...which, after simmering 4 hours and being poured through a strainer, turned into this...


...a total of 2 gallons of thick, rich, golden, turkey broth. Yum! Into the freezer, ready to be made into batches of hearty, hot soup this winter.


This week it's on to Christmas decorating and, I hope, cutting fabric for the back of Lucy's quilt. I decided to use the two yards of hand-dyed batik from Fabrilish, pictured at right, for the center panel. I'd been saving it for something special, and it doesn't get more special than a quilt for your first grandchild!

A wide border will be pieced in alternating blocks in a dark-green Hoffman batik and a light-blue print--overall, a much more peaceful look than the lively, colorful underwater scene on the front of the quilt.


Hooking up over at Lizzie Lenard's Free-Motion Mavericks blog, since I actually got some free-motion work done this week. I love the idea of sampling thread the way she does. Check it out! Also linking up with Sarah Craig's Whoop Whoop Friday blog. She has posted some lovely projects from other quilters. And I'd like to thank her (not!) for reminding us that there are only 20 (now 18) days until Christmas...YIKES!!!


Have a wonderful week.  :)

Linda

Tuesday, November 11, 2014

'Ghost' Quilting

The main occupation around here for the last 4 weeks: cutting fabric from the 142 fabric sample books obtained for free this past summer into squares and strips, and dividing them into groups by length and color.

This is most of it, but not all.

Here's a tip: save all those big mixed-greens containers you might be getting from the grocery. They really came in handy!


There are probably enough strips and backing squares for at least 4 q-a-y-g quilts. The quilts will be donated to the Center for Women and Families here in our town. The most recent quilt we took in will be auctioned off at their annual fundraiser in February. This makes me very happy, and all the more excited to make the next one.


After all that cutting, I was itching to get back to the sewing machine. So I pulled out something that has been on my radar for quite a while: Martha Ginn's article on Ghost Quilting in the January 2013 issue of American Quilter Magazine.


You just fuse a section of print fabric onto a solid fabric, and then sketch extensions of the print designs out into the border (hence the 'ghost' in ghost quilting). It can be as precise or as casual as you like. Then make a quilt sandwich, baste, and stitch both the print outlines and your extended lines with free-motion quilting.


It's fast and easy if you keep it small (I used a fat quarter for the background), and it's fun! You can paint or thread-paint any, all, or none of the 'ghost' parts--your choice. In this case, there needed to be a little color out in the border to balance the overall design, so another flower was sketched there and painted, similar to the printed one.

Before blocking


Then the piece was steam-blocked. For anyone who is familiar with my work, you already know why I always block. If you're not familiar with it, these two photos pretty much speak for themselves.


After blocking


In case it isn't obvious (click on the photos to enlarge), the steam-blocked version always turns out smoother and prettier than the fresh-stitched version, which is generally somewhat warped. This makes a huge difference in the way it looks when bound and hung on a wall.


After blocking, the piece was squared and trimmed. The binding, made from roughly 1/3 yard of a batik print, was soon attached.

Pay no attention to the little piece of red thread that doesn't belong here--just forgot to use the sticky roller!

Again, this was fun and quick--as well as a great way to practice free-motion quilting. It is NOT supposed to be perfect...far from it! The whole idea is for it to look like a sketch. The leaves could all have been painted, but that would have slowed me down. Besides, I liked the outlines just fine.

Meanwhile, the studio bathroom has been partly converted to a winter greenhouse for the houseplants that had taken a summer vacation outdoors.
Every bathroom should have one. Just don't try to take a bath.

On the baby front, the yarn destined to be a baby afghan for our first grandchild (a girl, named Lucy, due in 4 months!) arrived this week, and I cannot wait to start! James C. Brett's Flutterby Chunky, a chenille baby yarn, is arguably the softest yarn on the market. It reminds me of the fur on our pet rabbit, Nibbles, when he was a baby (some 50 years ago)--it's that soft. The current plan is for a crocheted fan-shell pattern.


In progress is a vintage pattern (1960s) sweater, bonnet and booties set in a pastel green yarn my friend Kathy gave me, part cotton but mostly acrylic, with a beautiful sheen. The bottom two-thirds of the sweater is a wide ribbing. The yoke is in a mock cable pattern (barely started here). Just gorgeous, and definitely feminine.


One more photo, below, shows a tip that I'm pretty sure came from Sarah Ann Smith's wonderful book, Threadwork Unraveled.


The pincushion is labeled at the top with the first letter (or two) of each type of machine needle you have. The different sizes for each are written beneath each letter.

The pin is placed according to what type/size needle you currently have in your machine, and stays there until you change to a different type or size. You can also stick new or slightly used machine needles in their respective spaces so that they'll be ready and waiting when needed. I love this tip and wish I'd seen it years ago!


Time to sign off and go knit. It's also time to get out the flannel sheets...first freezing temps of the season tomorrow night!

UPDATE: If you love landscape quilts and/or free-motion quilting, do yourself a huge favor and check out the latest Free Motion Mavericks blog entry from Lizzie Lenard's Vintage Sewing. I'm also linking up with Sarah Craig's Whoop Whoop Friday blog...go there for tons of inspiraton!

Linda

Wednesday, October 15, 2014

New Inspiration

Though lots of projects were in the works these last few weeks, none seemed big enough or near completion enough to blog about them. But after cataloging my yarn and while doing a second sort on the fabric samples I picked up for free this summer, I thought I'd go ahead and share some things that got done between all the organizing.

First, though, here are some beautiful hand-painted/hand-dyed fabrics brought back from the AQS Chattanooga show in September (click on a photo if you'd like to enlarge it).


Most of these half-yards and yards came from the Joy's Fabrics & Quilts booth. Some came from the Fabrilish booth. All are to dye for (get it? :). By the way, this is all my friend Janet's fault, because she arrived at the show a day before I did and knew just which booths I would like most. When the Visa bill comes and my husband sees it, she is in big trouble.  :D

The yardage not shown yet is this one...


...and it was used for something very un-quilty...


...which is the first outfit I've sewn for our first grandchild, due in mid-March. If you haven't guessed from the photo, we are having a granddaughter! :) :) :) Talk about new inspiration! Until this outfit, I hadn't sewn a garment for decades! Anyway, this photo just goes to show that hand-dyed batiks don't have to be used for quilts. This one was the perfect weight for a pair of toddler slacks. Which reminds me, my granddaughter won't be able to wear this until she's around 18 months old. Meanwhile, it hangs in the studio closet and makes me smile every time I open the door!

In the meantime, landscape quilting has not dropped off the horizon (good grief, another pun--my husband would be proud). Retrieving some Kona cotton sky and water pieces painted last year, I stuck them on the design wall and pulled out some batik scraps that reminded me of mountains.


The water piece looks like somebody cleaned up a murder scene with it, but that's not the point of this photo. What I'm especially liking here are the numbered pins. These came from the Chattanooga show, too. Here they are in their special container:


It is so wonderfully convenient to have the landscape pieces already numbered, in order, just by pinning them to the design wall. After that, you take a photo, upload it to your computer, and set it as the wallpaper on your screen (or print the photo) for reference. This makes it so much easier to re-position the pieces when you're ready to fuse or glue them.

Of course you can number flower pins with a Sharpie. But as the lady I bought these from pointed out, this container (which opens on both sides, with pins numbered up to 20) is the perfect way to keep them organized so that you're not rooting through dozens of pins just to find one particular number.

Another helpful tool used recently is the turntable cutting mat from Olfa.


But I wasn't cutting anything. Instead, it was used for tracing the mountain pieces onto paper-backed fusible. Instead of angling myself around the big cutting table to trace from all sides, all I had to do was turn the mat. It worked great!


Here's how the landscape quilt is progressing, so far.


It will probably change; in fact it might even get cut apart in the middle, between the mountains and their reflection. The bottom half (minus the grass) could be turned around 180 degrees and become the sky and some distant mountains for a second quilt. We'll see.


My knitting has been in turbo-drive for a while now. After finishing dog coats and sweaters for our grand-dog Rue, I started projects for our granddaughter. Here's something completed just today for her to wear on cool days next spring and possibly next fall. I call it 'confetti capelet and hat.'


I flew by the seat of my pants on some of this project; however the capelet is loosely based on a free pattern from the internet, and the hat sort of follows Elizabeth Zimmermann's Knitting Workshop instructions for knitted caps. I left the hood off of the capelet and just used stockinette stitch instead of Lara Neel's pattern, and added chenille yarn for lots of contrasting trim and some pom-poms.

Hoping to start work soon an another q-a-y-g quilt for The Center for Women and Families here in our town. That will be another great opportunity to use the wonderful old Singer 403 my husband bought at the thrift store last year for eight dollars. (I'll never get tired of bragging about that! :) But it will have to be worked around two big pre-holiday projects: cleaning out the china cabinet and shampooing carpets.


One last photo to share--The Visit being viewed at the Chattanooga show. This one tickles me pink, because the middle lady is actually pointing at it! :) (Obviously, I'm easily tickled.)


Update: It's Friday and time to get your Whoop-whoop on over at Confessions of a Fabric Addict. Check out Sarah's photos and all her linkups!

Hope you're enjoying your fall season, wherever you may be!

'Til next time,
Linda

Sunday, September 21, 2014

Around the World Blog Hop

Two weeks ago, the beautifully inspiring Lizzie Lenard Vintage Sewing blog participated in the Around the World Blog Hop, and passed the baton to me for today. As I'm dealing with a raging head and chest cold and am practically collapsed over the Kleenex box, this might be a very short blog, at least for me. Here we go...

1. What am I working on?

A top-secret quilt top. Well, top-secret enough that I'll block my son and daughter-in-law from seeing this post when it's linked to its Facebook page, but not so top-secret it can't be shared here, at least in part. It's a (nearly) twin-sized bed quilt for their first baby and our first grandchild. (Wednesday night we're heading to a 'reveal' party, where I'll have the honor of cutting into either a pink or blue cake...we won't know until it's cut! After that, it's full speed ahead on quilting, sewing and knitting projects, since I'll finally know whether to avoid pink, lavender and frills in the things I'm making for the baby.)

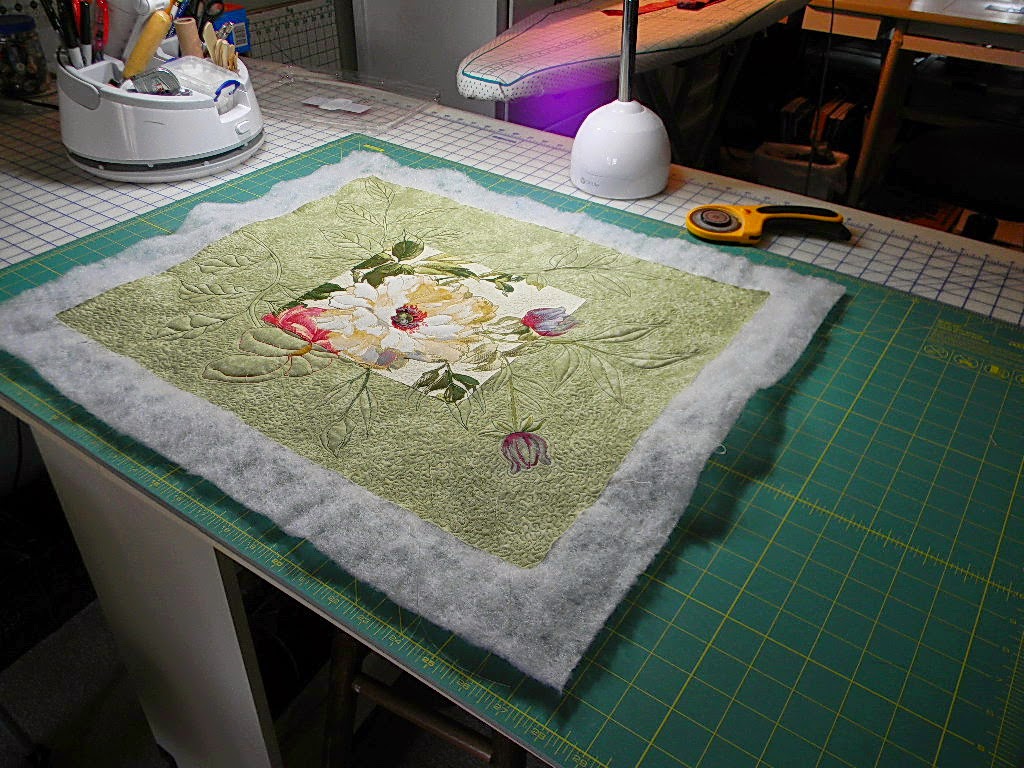
Here is the lower half of the top-secret quilt top.

The upper half of the photo is cropped off because that's where the star of the show is--and he's not finished yet. Also, just in case my daughter-in-law happens to check in on the blog unexpectedly, she won't see that part and will still be at least a little surprised when she sees the finished quilt.

(For some closeups on my failed attempt at stitching feathers on the seaweed--hearts are more appropriate for the baby anyway, right?--see the previous blog entry, Feathers with Heart.)


2.  How does my work differ from others in this genre?

This requires some clarification--the quilt shown above is not my usual 'genre.' I'm mostly a landscape quilter. My landscapes are a combination of techniques from almost every landscape quilter who has written a book on the subject, so I can't say my work really differs at all. My last landscape quilt, however, differed somewhat from all the previous ones I'd made, as it was almost more of a story quilt than a landscape. Here's a photo of the quilt, titled The Visit:

Suspended on a sagging copper pipe propped on an open attic door
and a pegboard. (Fortunately, the AQS show came up
 with a better hanging system.)


It just returned from the AQS show in Chattanooga, where people were asking me, "What is the story behind this?" But I'd rather let viewers decide that for themselves. Makes it a lot more fun for me and, I hope, for them.


3. Why do I write/create what I do?

Because I have to. And I mean that. Anyone who routinely makes use of his/her creative talents (and everyone has at least one) to the extent that it is one of the main parts of his/her life, does it because he/she has no choice...it is what keeps that person sane and balanced. If my husband realized what a freaking nut case he'd have on his hands if I didn't immerse myself in creative outlets, he would cease to begrudge even a minute of the time spent upstairs in my solitary space. Don't get me wrong, he's usually fairly understanding; it's just that sometimes, on the rare occasion he doesn't have a project in the works himself, he can be a bit testy about the time I spend on mine. And do you know why? Because, he's one of those potential nut cases, too...he just doesn't realize it! :)  I truly believe we were all given our respective gifts to help us stay grounded and enjoy life to the fullest (and bring in the bacon--everyone should be doing what they love for a living, or at least for part of the paycheck). It's a real shame to let our Creator-given talents go to waste.


4. How does my writing/creative process work?

I used to write somewhat dark, edgy historical romance novels; now I construct colorful, not-so-edgy, fabric landscapes. But the inspiration isn't all that different. The novels both began with dreams, and most of my landscapes started with scenes in my head. Only three of the quilts -- The Visit, The View from Merlin's Cave and Rock of Ages -- were based on photos. The process entails many or all of these: designing, drawing, tracing, cutting, gluing, fusing, painting, embroidering, and of course quilting and binding. Also steam blocking. Normally, there would be three or four quilting projects in various stages at once--something I recommend, as it keeps boredom at bay and allows you to switch gears when you need to break away from a project. Currently, though, all my other WIPs are knitted items for the baby. Landscapes can wait!


Now that I've coughed all over my monitor and keyboard and have run out of tissues, it's time to stop writing and grab some alcohol wipes. (And maybe some alcohol--the medicinal kind. It's not for nothing I live near the heart of bourbon country. Note, I'm writing this on late Sunday afternoon for posting on Monday morning. Bourbon for breakfast? Even sixty years in Kentucky haven't come to that. lol)

It's also time to pass the above questions on to another blogger. Susan at The Bored Zombie has one of the most fun, inspiring blogs around. She is a member of The Bad Ass Quilters Society. In Chattanooga they exhibited several quilts, a body of amazing work including Susan's gorgeous Windows to the Orient. Look for her on the Around the World Blog Hop next Monday. Thanks again, Susan. And thank you Muv, for including me in the fun!

'Til next time,
Linda

Thursday, September 4, 2014

Feathers with Heart

In my four years of quilting in free motion (feed dogs down), I had never stitched the much-touted 'feathers.' So I was feeling pretty good about having finally taken the plunge yesterday...until I looked a little closer.


These are not feathers...are they? They're more like hearts, right? At least where the halves match on either side of the center vein. Wherever they don't match, I'm not sure what you'd call them. Anyway, they seem to work pretty well for the water plants in the underwater scene quilt. But that means I still haven't stitched 'feathers' in a quilt! Ah, well, someday...


Empty square reserved for quilt dedication
Also added were sea creatures on the ocean bottom. The sand dollar, starfish, and octopus came from photos I found and cropped, then printed on printer fabric, sprayed with Scotch-guard, and embellished with Isacord embroidery thread using a hoop.

Enough margin was cut around each creature to satin-stitch the printer fabric (fused with Steam-a-Seam 2 Lite) onto the quilt top with a dark-green thread that blends into the background fabric.


Also been doodling with other plant designs for free-motion stitching in the borders, and came up with this. (It wouldn't surprise me to find out that this was in one of my quilting magazines and my brain just retrieved it from the ol' memory bank.) Notice what we've got going here...again!


Sure looks like hearts to me. And now that I think of it, there may be a good reason for that.  :)

Speaking of which...

There's a new drawer in the studio.


This drawer is far from full, but we just got the news a few weeks ago, and now we're waiting to find out if our first grandbaby is a boy or a girl. (Until then, I'm firmly disciplining myself to keep all pink, lavender and frills out of anything to which I take a needle of any kind.)

Meanwhile, VVHH (very versatile handy husband), who made the quilt studio and tons of other amazing things in this house, has been making use of the hundreds of wine corks in our basement. Until recently he'd been making beautiful cork bulletin boards with them. Now the corks are taking on a life of their own--wildlife, that is. Meaning, specifically, reindeer and Christmas trees!

(excuse the acrylic sewing table)

The cicada-shell cowboy riding the center reindeer was not my idea.

I'm finishing up here with some other non-quilting photos taken this morning, just because it's a beautiful morning and is approaching my favorite time of year...fall!

Garden harvest and part of tonight's pasta sauce (Run, tomatoes, run!!)

Speaking of wildlife...

Hornets' nest next door. So far they've been no trouble.

Kitty and Mama Cat, who adopted us as their people in 2010, and have their own lawn chairs out back for sitting with us while we drink coffee in the morning. Our indoor cats think they're the devil.


Rock brought from the same place that is pictured in the background quilt (Rock of Ages) on this blog page. The hole was worn naturally by water eons ago.


Hooking up here with Confessions of a Fabric Addict for Whoop Whoop Friday. Go there and see what an awesome gift Sarah received this week! Also linking to Lizzie Lenard Vintage Sewing's Free Motion Mavericks. Check out her beautiful work, as well as the inspiring reader links at the bottom of each of these blogs.

Have a wonderful weekend~~

Linda

Friday, August 29, 2014

Catching Up

Quilting news ahead...first things first, though. When I last posted several weeks ago, my dear friend Kathy was about to have a kidney removed. As of 2 days ago, she's home and doing well. Many thanks to everyone for all the good wishes and encouraging words! Kathy's cats survived (thank goodness, since my husband and I took care of them) but her croton plant did not. This is the second croton I've killed in the last few years. Both times, I watered all the other plants, but somehow missed the croton...which is one of the most colorful, vivid houseplants in existence. Go figure!


Speaking of colorful, right before Kathy's surgery I finished a double-layer fleece winter coat for our granddog Rue, after learning that Chihuahua breeds don't handle going out in cold weather well. Her mommy, my daughter-in-law Shannon, thinks Rue looks like a '70s model in this photo. I agree.

Other people teased that Rue needs a sombrero with this coat. Well, I can't make one of those :), but I did knit a sweater and a cape for less frigid days. Rue hasn't made it over here to try those on yet. When she does, there will be more photos.  :)


A few days later, Shannon and my son Alex came to our house bearing a gift....the best gift my husband and I have EVER, EVER received....


EVER!!!!!!!!!!!!!!!!!!!!!!!!!!!


This will be our first grandchild (due March 15). Six weeks after receiving the news, I'm still pinching myself in disbelief and grinning to myself like an idiot. Today I was dancing in the grocery. In 2 or 3 weeks, we'll know the gender of our grandbaby. Which is a good thing, because I've come this close to making something in lavender and ruffles. Not because I'm hoping for a girl, but because I couldn't make those kinds of clothes for my two sons!

On to quilting projects/progress/news. Click on any of these photos to enlarge....

1.  Finished my 2nd quilt-as-you-go project for The Center for Women and Families here in our town. This quilt was pieced from remnants, scraps, and fat quarters, and was oh-so-fun to make on the 1958 Singer 403, the amazing machine my husband bought for 8 dollars at the thrift store.

front
back


2.  Began an underwater scene quilt.

first design

second design

in progress

 3.  Rock of Ages was awarded 2nd place at the 2014 Kentucky State Fair in the 'pictorial quilts' category. (You might recognize this quilt as the background on my blog.)


4.  SOLD Rock of Ages.
     (I kid you not. The quilt sold just 10 days after it received the ribbon...and the buyer had no idea. She had been keeping her eye on it in my Etsy shop for 2 months. The timing was purely coincidental.) Just for fun, here's a photo of the quilt in the designing/piecing stage.


5.  Sold New England Dawn (to the same buyer, 2 days after she bought Rock of Ages...needless to say, I felt both thrilled and very grateful). This, by the way, was the first quilt for which I made those machine-embroidered shrubs.


6.  Performed eye surgery on Lida Luna yesterday. She went from this (photo on left)....


                                             to this:


The two eyes just didn't look right, as my sister Karen and my friend Kathy observed. I hadn't been entirely comfortable with two eyes, either, knowing that one should be almost out of view. Not to mention, Lida looked a tad cross-eyed with two. But I was also afraid that a single eye would look a little odd. As it turns out, I like the single eye a lot better. Also, the eye is now a silver bead instead of a black one. The black bead was a bit too in-your-face.

The AQS show in Chattanooga is just 2 weeks away! The Visit arrived safely for the competition. I can't wait to see all the wonderful quilts, and sure hope to run into some of you there.

Hooking up with Confessions of a Fabric Addict for Whoop Whoop Friday. Check it out, Sarah is raffling off another beautiful quilt!

Have a wonderful weekend. We're due for lots of rain, but I'm ready for it after all this heat.

Linda