Friday, June 26, 2015

Wave Bye-Bye

Having the privilege of guest hosting the Free Motion Mavericks blog for a second week, I want to first thank everyone who commented and linked up last week. Again this week, the linkup will stay open from 12:00 A.M. EDT (not GMT) Friday to 12:00 A.M. EDT Monday. Please join the party! Muv at Free Motion Mavericks is looking forward to seeing lots of blog posts when she returns, and I'm looking forward to seeing them this weekend.

More progress on the densely FMQ'd fat quarter featured last week. It's gone from this...


...to this, so far:


Notice that the 'missing' mountain referred to last week (on the left) isn't missing anymore. I went back with a darker thread and stitched between (and sometimes over) the lighter thread.

At some point I realized it's a good idea to stitch wider apart at first, so that you can go back between the lines and add a different color or shade, if needed, for correcting or blending. If no change is needed, you just stitch between the lines with the color you used the first time through. This is a lot easier and looks much nicer than the places where I 'traveled' over a previous line of stitching.


Here's the original fat quarter again--with a few lines of marker ink sketched on it--for anyone who missed it last week (click to enlarge).


And again, at right, what's been quilted so far, for easy comparison with the fat quarter photo.

I've reminded myself several times that this is an experimental piece, something I'll keep instead of selling, so it doesn't have to be perfect or even near-perfect. This and the meandering horizontal stitching has made it more relaxing than most projects.


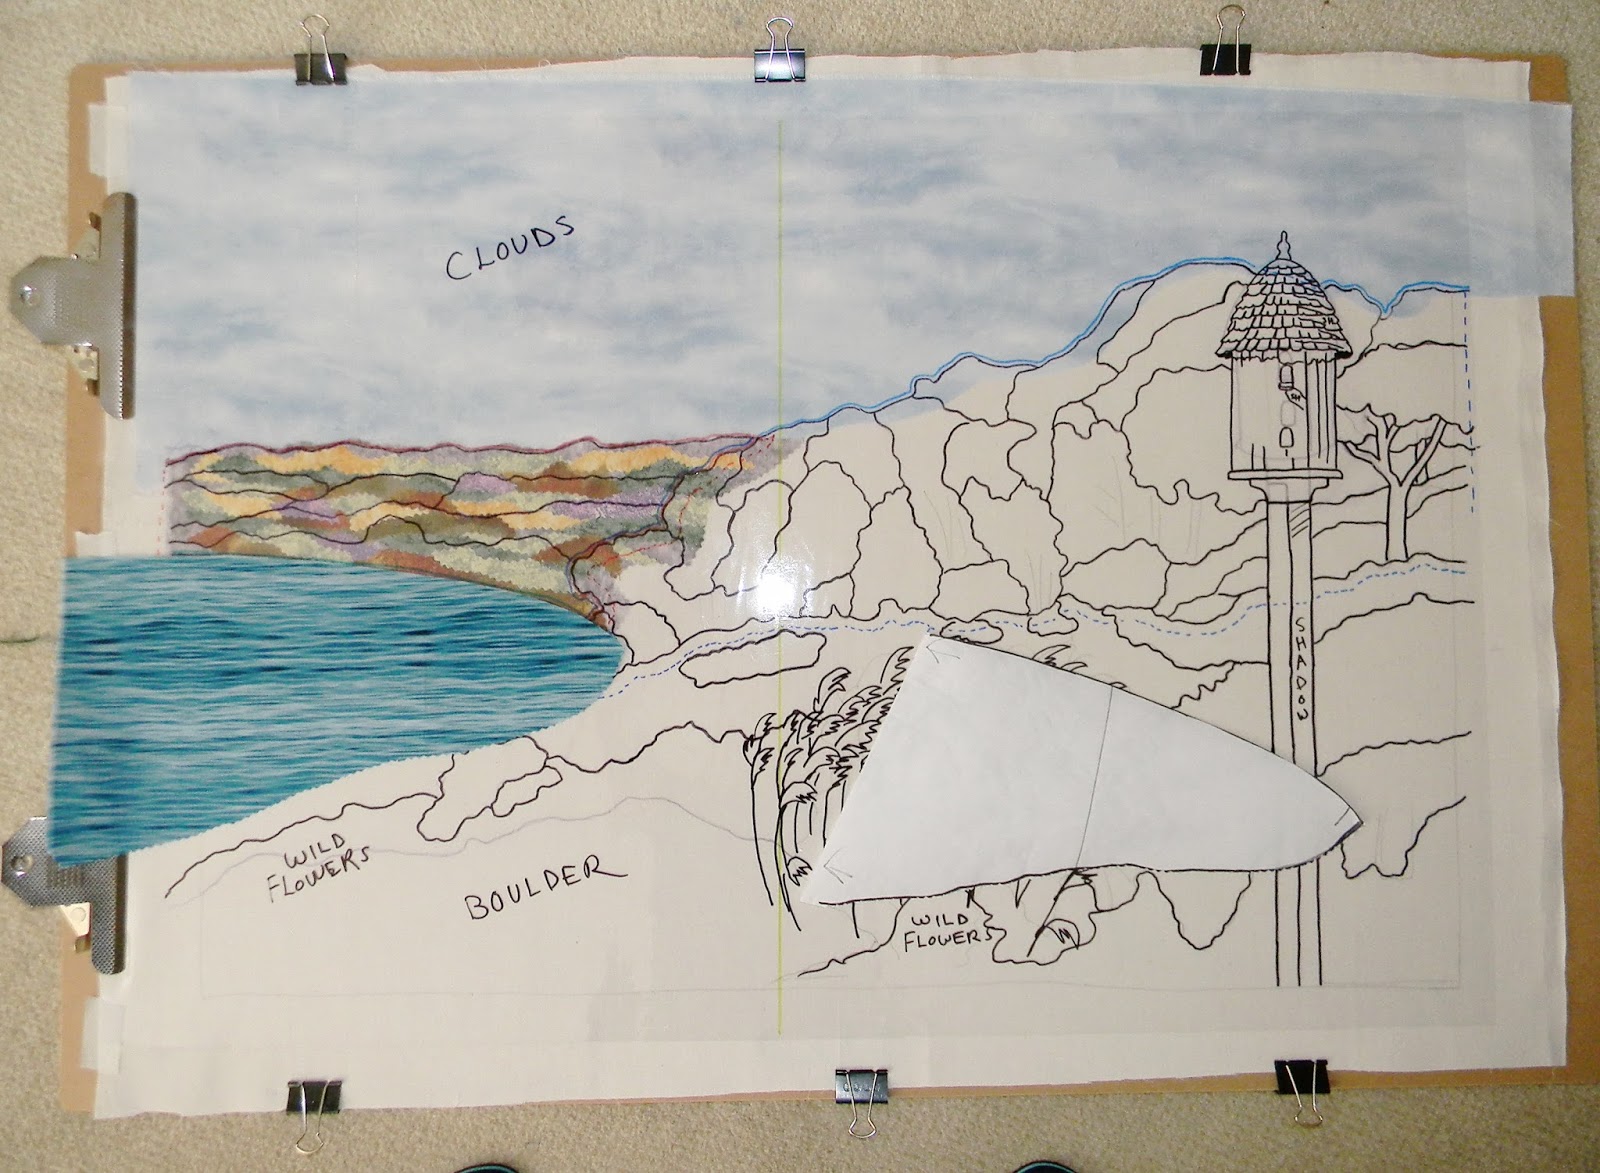
On to a different, not-so-relaxing, FMQ project. I promised an update on The Overlook landscape quit. Remember that wavy water fabric I was fighting with?


Well, I finally gave up on it. Don't get me wrong--it took two whole afternoons of re-positioning, test-fitting and staring (glaring) at it, for me to finally throw in the towel. I'm nothing if not bullheaded. But the waves didn't look right no matter how the piece was positioned, and after hours and hours of getting nowhere, it was time to move on. Bye-bye, waves.


Despite having decided that nothing else in my stash would suit, I took another look at a too-bright-blue batik. Beggars can't be choosers (old saying).


A layer of white tulle lightened the blue a bit. (A second layer was tested, but it was too much.) This should look more like water after waves are drawn and quilted on it.

Hooking up here with Whoop Whoop Fridays and WIPs Be Gone. Check out their blogs and their readers' blog linkups for plenty of weekend fun!

Okay, on to the linkup! Here are the easy instructions from Free Motion Mavericks:
If you love free motion quilting, whether you are a beginner just taking the plunge, or you have reached the stage where you can do ostrich feathers with your eyes shut and still achieve perfect symmetry, then please link up.
Remember, FMQ is FMQ, whether your machine was made last week, or it is older than your granny.
Here are the very easy and slightly elastic rules:
1. Link up with any recent post, ideally from the last week but within the last month, which features a free motion quilting project, whether it is a work in progress or a finish.
2. Link back to this post in your own post and/or grab the linky button for your blog's sidebar.
3. Visit as many of the other participants as possible and say hello in the comments box.
4. The link up will remain open for four days, from midnight to midnight EDT (not GMT as is usual) for the long weekend, Friday to Monday.
Everyone, please join the party, and have a great week!

Linda

Thursday, June 18, 2015

Quilts of a Different Stripe

This week and next, I'm honored to guest host for Free Motion Mavericks at Lizzie Lenard's Vintage Sewing blog, while Muv is on vacation. She hopes readers will link up below as usual to share their free-motion projects so she can see them when she returns.

Some progress was made on The Overlook quilt; more on that next week.

In the meantime, this stripey hand-dyed batik has been speaking to me for some time, and this week it demanded attention. Notice the faint turquoise lines. They weren't in the original fabric, but because the dye streaks seemed to form a vague landscape, I had already sketched a few lines on it with a Sharpie marker.

UPDATE: I think this fabric is by Robert Kaufman; not sure.
Odd but fortuitous timing on this project, since the free-motion stitching I planned to do was inspired by Muv's landscape, The Solent, featured on her Free Motion Mavericks blog.

So here's what's been done since yesterday. Scroll back and forth between this photo and the one above, to see how the fabric has changed so far.


Here's a closer look.


The trees are a mess. I plan to do more thread-painting on them, crossing my fingers the whole time that they'll turn out better instead of worse. (Ever try to sew with crossed fingers?) There's also a missing mountain on the left, meaning my thread was so light it blended right into the sky. I'll have to fix that, too, by traveling over my stitching with a darker thread.

This is not the first time a stripey hand-dyed fat quarter has suggested an entire landscape to me. The first one, pictured below, was handled very differently from the one above (click to enlarge).

Original fat quarter (by Robert Kaufman)
Marshland Paradise, 2012 (sold)


This one was pieced, like most of my landscape quilts, with raw-edged applique, and quilted in free motion.

Next week, I'll post an update on the current stripey piece, as well as progress made on The Overlook.

Now we come to the link-up instructions, copied and pasted from Free Motion Mavericks:
If you love free motion quilting, whether you are a beginner just taking the plunge, or you have reached the stage where you can do ostrich feathers with your eyes shut and still achieve perfect symmetry, then please link up. 
Remember, FMQ is FMQ, whether your machine was made last week, or it is older than your granny. 
Here are the very easy and slightly elastic rules:- 
1. Link up with any recent post, ideally from the last week but within the last month, which features a free motion quilting project, whether it is a work in progress or a finish.
2. Link back to this post in your own post and/or grab the linky button for your blog's sidebar [button is on Linda's sidebar at right].
3. Visit as many of the other participants as possible and say hello in the comments box.
4. The link up will remain open for four days, from midnight to midnight EDT (not GMT as is usual) for the long weekend, Friday to Monday.
And that's all there is to it. Crossing my fingers I do this right and the linky works.

Linking up here with the Whoop Whoop Friday blog. You've got to check out Sarah's beautiful fabric boxes.

Have a great week!
Linda

Saturday, June 6, 2015

Wavering

Picking up where I left off on the newest landscape project last week, there was just enough Mistyfuse in the drawer for the sky fabric. So it's now fused to the muslin base. I love Mistyfuse; it doesn't seem to gum up the sewing machine needle at all.

(Click on photos to enlarge)


For anyone who hasn't pieced a landscape quilt, notice the extra sky fabric below the treetop line. That's the overlap (I think I called it a 'seam allowance' last week, which comes from a garment-sewing background). This overlap ensures a gap-free join of the sky and tree fabrics.


But now the overlap covers the treetop line on the muslin (as well as the birdhouse top)...which is why it's important to have the vinyl overlay.

You might ask, why bother with drawing lines on the muslin if you're just going to cover them up as you work your way down? Well, if you need to remove the vinyl and take the quilt top to the ironing board to do any fusing, like I did the sky fabric, you'll have to re-clip the vinyl afterward--and it needs to be in the very same position as before. Without those lines on the muslin, you'll have nothing to go by. If the sky overlap was an exact measurement all the way across (it isn't) you could sort of wing it and guess where the lines should be. But I guarantee you, after doing that with a few more sections or pieces, your landscape would start looking pretty wonky.

The next section was designed offsite--seperately, off the quilt top.
This is the hill beyond the river bend. The outline of that whole section plus overlap was traced onto freezer paper from the lines on the vinyl overlay. The freezer paper piece was ironed onto a mottled gray fabric and then was cut out. Why gray? In the photo, that section is distant enough to actually look gray in places, and an even further set of gray-looking hills shows faintly above it.

Compare with the previous photo: the colors are softer.
A tear-away stabilizer was used beneath the base fabric.


Then, little snippets of color were glued to the gray fabric to represent groups of trees on the hill. The colors were a bit too vivid to be in the distance (the further away, the more muted the colors should be), so a layer of white tulle was laid over the section and basted, free motion, around the edges (after the glue dried). The difference in appearance is subtle but will add to the illusion of depth.


Then the whole section was glued with a glue stick, edges only, but heavily (ran out of fusible), onto the quilt top, using the vinyl overlay as a placement guide. So this section now overlaps the sky, as it should.

Note: the vinyl didn't need to be un-clipped for this step, but of course it needed to be laid back out of the way. Remember though, vinyl sticks to itself. If your table isn't bigger than mine and you can't lay the vinyl back flat, just lay a piece of paper over the vinyl (the liner paper that comes with purchased vinyl is perfect) and roll it all back neatly on a mailing tube. When you unroll it over the quilt top again, the vinyl will be smooth and straight, and still perfectly aligned if your clips are good and tight.

Needed a light box to see the waves through my pattern piece

Next up was the river piece. Same procedure: trace the outline of the river section plus the overlap at side and bottom, then iron the freezer paper pattern to my fabric.

But hold it! There was a challenge here: the fabric has water-wave lines. They need to be horizontal, of course--not even the least bit cockeyed. If I don't get that right, the whole quilt is going to look really strange.


What I needed was a true horizontal line--or a true vertical line--from something in the original tracing of my landscape. Then I would be able to draw that line on my vinyl overlay, and use it to find the true horizontal or vertical of my river pattern piece.


However, there is not a single true horizontal line in this scene. So a vertical line, then.

The obvious one would be the birdhouse pole, right? Nope. Some quick ruler work shows that the pole is stuck in the ground crooked!

Which leaves only one true vertical line (if the builder did his job well): the left wall of the cabin. And, probably, the corner post of the deck railing next to it.


Trouble is, that line is all of 3/4 of an inch long in the enlarged drawing and is teeny-tiny in the photo. Warily, I lined the ruler up with it the best I could and drew a parallel center line down the entire vinyl overlay. It looked about right. From there I came up with a corresponding vertical line for the river pattern piece, positioned it perpendicular to the waves in the fabric, and cut it out.

water going slightly uphill, left to right

Time to test-fit the river piece on the quilt top.

After going back and forth repeatedly, this was the closest I got before time to stop for the day. To the naked eye, both these positions looked about right. But the camera saw it differently. And the piece cannot be glued down until it's just right--somewhere in between these two positions--and there's only about a quarter-inch difference between them.
water going slightly downhill, left to right


So, rather than continue this argument between my eyes and the camera, I've decided to go ahead and construct the cabin section, then test-fit it along with the river piece before gluing it down. It should be a lot easier to tell at that point whether the waves are truly horizontal, with the vertical cabin wall so nearby.


Didn't mean to be so lengthy here, but this is a good example of the challenges that can come up in the landscape quilting process. I rarely find them discouraging, though. There is always a solution, and it's fun trying to find it if you're not under a deadline.

Linking up here with Whoop Whoop Friday (hey, I started this post yesterday!), WIPs Be Gone, and Free Motion Mavericks (this will be a free-motion quilt). Please check out these wonderful blogs if you haven't already; their reader linkups, too. Tons of inspiration!

Have a great week!

Linda