Friday, December 9, 2016

Diamonds in Autumn

As promised in the last blog post, we have a finish for the blue-and-gold quilt, the final arrangement of which is basically a diamond pattern. This will be going to The Center for Women and Families in time for Christmas, along with the other four quilts shown in previous posts.

VVHH is standing behind the quilt. He's become pretty good at playing The Invisible Man. His tennis shoes don't even show anymore.
This is a log cabin quilt made with the nine fat quarters of FreeSpirit Fabrics Wander collection, by Joel Dewberry, that arrived in the April 2016 Quilty Box. I added several Hoffman Watercolor batiks and a gold print border to make this a smallish, twin-size quilt.


A dual-feed foot and a built-in machine stitch were used to quilt the interior on the diagonal, first in dark-blue thread, and then between those lines in a bright-gold thread.


The border was marked with a homemade diamond-shaped template, and a freehand design in the corners.


The backing is a soft, high-thread-count, gray-and-white ombre sheet bought at a consignment shop.


Even before the binding was sewn on, my conscience was already nagging me because it had been a couple of months since a landscape quilt was on the design board. And although autumn is nearly gone, I still want to do a woodland scene depicting that time of year.

So, first the background fabric and some trees (the foreground will be covered)...


...then some middle ground...


and then some foliage...


...and that's about as far as it's gone for now. Holiday season tasks are quickly overtaking other priorities. I'm sure everyone can relate to that!

Linking up here with Whoop Whoop Fridays. Sarah has finished some quilts for her grandchildren for Christmas, and her labels just bowled me over (and brought tears to my eyes). Check out her blog post, along with her inspiring reader linkups.

Have a wonderful weekend!

Linda

Thursday, November 24, 2016

Lumpy Quilts (and a Sale!)

Happy Thanksgiving to anyone who is celebrating the day!

This post was supposed to show a photo of the blue-and-gold quilt top. Well, I forgot to take that photo, so here is one of the top while being pin-basted:


Also, a finish for the quilt that ended up with the weird lump in the middle:


That lump is the result of too many quilted lines joining in the same small area. What can be done? Only one thing. Just smack it down and hope it stays.


(So far, it has not re-arisen by itself. If it does, I will call in an exorcist.)

On to something a little more celebratory. For the second time this year, one of my quilts is being published in Art Quilting Studio (the cover at that link is also one of my quilts, and was my first time ever published -- UPDATE: a newer cover issue's cover has now replaced it), by Stampington Publications! This magazine has been one of my absolute favorites for years now, so it's not just an honor for me; it's a thrill. It will be out on stands December 1, 2016, at JoAnn Fabric and Craft Stores, as well as Barnes and Noble Bookstores.


For anyone who's followed my blog for a while, you might remember that this piece was inspired by Margaret "Muv" Porwal's art quilt, titled The Solent, at the Free Motion Mavericks blog. It was the most calming project I've ever done. Thank you, Muv.

One more mention: There's a Black Friday through Cyber Monday sale going on at my Etsy shop! Get 30% off list price of any item now through 11/28 simply by using coupon code EARLYBIRD64 at checkout.

Linking up with Whoop Whoop Fridays. Sarah just finished a quilt for her granddaughter and has given me inspiration for a quilt for Lucy!

Next time, the blue-and-gold quilt finish. Until then, stay warm (or cool, depending on which hemisphere you're in) and try not to freak out over your holiday season to-do list. (Advice to self, he-heh.)

Blessings,
Linda

Saturday, November 12, 2016

Duh Moments

Life keeps getting in the way of both quilting and blogging, but we'll pretend weeks haven't passed and just pick up where I left off.

Last post showed a log cabin block arrangement with modern prints from RJR fabrics and Quilty Box, along with some batiks. This was my first ever traditional block design and I was liking it. Refresher photo:


Well, here's how far the quilting has gone on that project...

One-third of the quilt. Doing it in sections requires more prep time, but is much easier to handle.
At first glance, it doesn't look bad. But if you look closer, you'll see that any point where several lines intersect has become problematic (duh). Especially the center...it feels like cardboard now (and this is puffy batting) and sticks up at weird angles when you move the quilt around. Thank goodness this is just a learning project!

A break (distraction) was needed. With the most insane election ever looming (should have turned off the tv), and yet another Quilty Box fabric selection (the Free Spirit Fabric 'Wander Collection' by Joel Dewberry) sitting idle, I impulsively retrieved the fat quarters from the latter and feverishly set about finding stash fabrics to coordinate with them.

The fat quarters at the top are from the Quilty Box. The rest are from my stash.
And I very much wanted to design another log cabin quilt. It's just so much more fun than I'd ever imagined it would be (see last post). I ended up with four each of the six different blocks below, made with 2-1/4 inch strips and trimmed to 11-1/2 inches:


(Notice, the 'logs' in the lighter blocks run in reverse order of the ones in the darker blocks. That way, each fat quarter was nearly used up, with only a few short strips remaining for the scrap drawer.)

But here's the kicker--the 'duh' moment--and I've yet to find this idea anywhere online, though I suspect a few thousand people are already doing it:  You know how you can spend hours and hours arranging and rearranging your quilt blocks on the design wall, and then how ratty they sometimes look by the time you decide on the final arrangement?

No need for all that. Because you can do about 20 arrangements in an hour--without touching the fabric blocks. Here's how:

1. Put one each of your different blocks on the design wall (see photo above).
2. Snap a photo.
3. Upload the photo on your computer, and on regular printer paper, print out however many copies you need to give you as many blocks as will be in your finished quilt. (I needed 24 total--four each of the six different blocks, so four copies of the photo.)
4. Cut out the paper blocks on all your printouts with a rotary cutter (I keep one just for paper cutting...use it for coupons, too!)


5. Arrange the paper blocks in whatever way you choose on a solid background (preferably black or white, but I used the back of my green cutting board) and photograph the arrangement.


6. Then rearrange the blocks, and snap a photo again.


Do this with as many arrangements as you wish, making sure to photograph each finished arrangement.
TIP: Move the blocks around with the eraser end of a pencil. It's much faster and easier than trying to move them around with your fingers!
7. Upload all the photos on to your computer, and then eliminate the ones you like least. I went from 17 arrangements to 3 pretty quickly. (It took me two more days to decide on the final one.)
8. Print out your final arrangement as large as possible on regular printer paper.


Use this to guide you in joining your blocks and in drawing your stitch pattern design. To do that, simply put the photo inside a transparent vinyl sheet protector (available at Walmart and office supply stores), and use dry-erase markers to draw your design on it. The lines are easily erasible with a paper towel, cotton ball or scrap of fabric, and you can start over as many times as you wish. (Sorry, the photo below is for the first quilt, and the blocks were done with color pencil before I figured out I could just take a photo of the actual blocks. Double duh. Haven't designed a stitch pattern for the blue and gold quilt yet.)


Next time, the finished quilt top (the blue and gold one...in fabric, not paper).

Linking up with Whoop Whoop Fridays, which I haven't done in months due to computer issues. All fixed now. Check out Sarah's Christmas presents and all the great linkups at the end!

Have a great weekend!

Linda

Tuesday, October 25, 2016

Better Late than Never

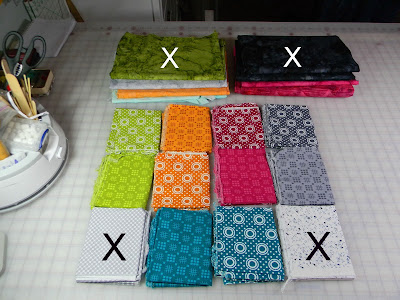
Ever since these RJR fabrics came in the May 2016 Quilty Box, they have haunted me.

The fabrics with an 'X' were not part of the Quilty Box
I've never made a quilt from modern fabrics. Most of my quilts are landscapes, and my few bed quilts have consisted of traditional florals and exotic animal scenes from donated upholstery fabric sample books.

Frankly, I didn't know what to do with these contemporary fat quarters. (Included were patterns for small projects, which just didn't appeal to me at the time.) But the bright colors and bold designs kept calling my name.

So now, months later, I've decided to make something totally crazy and out-of-the-box with them. You know, like...a log cabin quilt.

Yeah (said with a grimace). Not so out-of-the-box. But maybe a little crazy? You see, a good friend of mine recently told me that her favorite quilt to make is the log cabin pattern. I didn't get it. Wouldn't that be boring? (And wouldn't it look crazy in these very modern fabrics?)

No, as it turns out! I had no idea how many ways log cabin blocks could be arranged and how different the overall look would be with each arrangement. Wow!

Anyway, this is how it's played out so far. And I do mean played. Total permission given to self to relax and have fun. And gosh, what a fabric saver, since the strips are trimmed to exact length as you construct the block--something else I was unaware of until now. Do I sound like a total greenhorn? Well, when it comes to traditional quilt patterns, I am exactly that.

The shadow from my table light makes the lower right quadrant look darker. It isn't!
A few batiks and prints had to be added to make enough 12-1/2 inch blocks for a twin-bed quilt. Quilting will be done in three sections, with the batting cut into thirds and then rejoined after the center is done. That takes more preparation, but will save me lots of neck and shoulder pain in the long run (something learned while making The Visit), as my plan is to use a quilting design that requires plenty of thread-breaking and re-positioning.

Two finishes in recent weeks are more wonky-block quilts for The Center for Women and Families here in Louisville. I'm finally getting close to using up all the center motifs cut from those donated upholstery fabric sample books. (The calico-type centers came from a Quilty Box offering of pre-cuts from the Little House on the Prairie fabric line.)


Some of my favorite blocks from the fabric sample books:


That's it for now. Happy fall, and happy Halloween!

Linda

Friday, September 23, 2016

In the Black

This week has been a black one in the studio.

First, having finished some projects and before starting another, it was time to do something about the black hole.


Do you see it? This black hole (empty space at far left) has been plaguing me from day one in the studio, because anytime a bed quilt or large landscape quilt is in progress, the black hole tries to swallow it.

It's an odd-sized space, but it finally occurred to me that one of my Sterilite drawer units could fit below/under the little table. It was at least a start. (The drawers will be put back later, after their contents--fabric paints and brushes--have been transferred into a different set of drawers.)


Okay, so now what? Well, with my subscription to Quilty Box, those cool little shipping boxes that are always the same size and look like little shoe boxes, have been piling up in the attic. Well, guess what?


Right side up, one box, laid on top of the Sterilite unit, happened to be flush with the table top. I cut down a second box sideways, to fit next to the first box, and covered both boxes with postage tape to make their surfaces slippery.

In front of the Quilty Boxes I put a Whitman's Sampler candy box, and on top of it, a slick acrylic Tsukineko ink stand/holder turned upside down--again, flush with the table.

All of this stuff was already in the attic/studio space. I may not be the Queen of Recycling, but I might just be the Queen of Making Do.

After that, the ironing board was put back in its usual spot with my two favorite acrylic rulers on top of it and positioned flush with the tables, to finish off my slippery quilting surface. (Again...Queen of Making Do. It should be mentioned that the maple table has been with me for 45 years and has served in many capacities in many rooms.)


Don't get me wrong, though...the ironing board still gets used for pressing, and often. I just lay the rulers aside and quickly raise the ironing board (the iron is nearby). The more multi-purposing, the better.

The next project was to alter the waistband of a pair of very nice black jeans my son found for $4 in a thrift store. A word of caution here...maybe don't try to downsize a stretch denim waistband by more than an inch or two. This particular waistband needed to lose three inches to fit him--and that's without taking the stretch into account!


Hence, a total of ten wedges ended up being cut into the waistband (additional cuts are at the sides and in front), each tapering from 3/8" (any wider would have caused dimples below the band)) at the top of the waistband to a single point near the bottom of the band (an actual total of 3 and 3/4 inches, due to the insidious stretching that kept occurring during fittings).

The three-step zigzag stitch was used to pull the little wedges' cut edges together, stitched from top to bottom and back toward the top again, where a bar tack (repeated zigzagging with a very short stitch length) was stitched for extra strength. These adjustments won't show when he is wearing the jeans, as his t-shirts will hide the waistband.

Then came the hem (yes, the jeans were not only way too big in the waist but too long as well.)


The doubled-over hem (why cut it if you don't have to?) had to be pressed down and beaten into submission at the seams, but using the dual-feed foot and the hump-jumper allowed me to stitch the new hemline securely and attractively.

Next, I celebrated (?) the completion of that tedious project by turning one of the same son's old t-shirts into a pillow. (What can I say?...I'm a mom.)

He loves European Black Metal music, so has a lot of metal-band tees. When they start getting holes under the arms or raggedy at the neck ribbing, they become pillows.

Pellon SF101 Shape-Flex all-purpose woven fusible interfacing (black), a 14-inch black Coats & Clark closed-bottom sports zipper, and an 18-inch poly pillow form made this a fast project. The interfacing not only adds body and makes the t-shirt fabric very easy to work with, but makes any minor wear-and-tear on the t-shirt difficult to see. All-purpose sewing thread and a universal 14 needle was used, and worked well for everything--zipper included.


Most of his t-shirts have a design on the back, which gets used for the back of the pillow. This one had no back design. But this cool, black foresty-looking fabric was in my stash, and since my son loves spending time in the woods (just like his mom), it seemed like a good choice. I took a shot and used it without consulting him.

He loved it. 'Very metal,' he said. A mom-win! And don't we love those.

Well, it's nice to have all these black projects finished, but here's to working with some color again! Next week on the machine will be a quilt (not black) for The Center for Women & Families.

Have a great weekend!

Linda

Wednesday, September 14, 2016

Triple Finish

Very happy to report that this week, the batik scrap project begun two weeks ago...


...is a finished landscape quilt!


A big shout-out to VVHH for his part in this. He drilled three tiny holes in each seashell so that they could be sewn to the beach and not simply glued. If this were staying here at our house, Aileen's Jewel-It glue (great for gluing lightweight objects onto fabric) would have sufficed. But like most of my landscapes, this quilt is going into my Etsy shop, and will be rolled up on a pool noodle for shipping. So the shells--which were first glued on for easier sewing--could pop off if they weren't also attached with thread.

The coolest thing about this quilt, for me, is that it was made completely from scraps, except for the boats, balloons and shells. And there are plenty more scraps left in the drawer!

Also, remember the wanna-be 'ghost quilt' UFO (unfinished object) that was pulled out of the closet last week?


Now it's a FO.  :)

18-1/2 x 21-1/2
The print panels were cut from two different upholstery fabrics (look closely and you'll see that one background is white, the other ecru). I continued the upper red leaf into the lower panel, with color pencils and fabric markers. Both panels' edges were given a good dose of Fray-Check, as the weave wasn't very tight and would have frayed.

The border and binding are regular quilting cottons. It's easy to mix fabric weights and types in this project.

The hardest part, as usual for me when fabric markers are involved, was not getting too crazy with them! And as mentioned in the last blog entry, they really were necessary, because the stitching in this mid-tone border barely showed.

OFF SUBJECT:  Also this week, a finish for something for the Lucy drawer (Lucy is my little granddaughter).


This was knitted with Deborah Norville Serenity Chunky Heather yarn in a beautiful coral/gray/ecru mix called Oatmeal. Lucy won't be able to wear it until a year from now or maybe even the one after, but she has enough sweaters knitted to get by until then (Grandma just can't stop making them!).

So, all in all, it was a more productive week than usual. But only in the studio. The rest of the house...eh, not so much. Hey, we can only be in one place at a time, right?

Have a great weekend!

UPDATE: September is my birthday month, and we are celebrating at Linda's Landscapes shop on Etsy with FREE shipping! Just enter coupon code BDAY4LINDA at checkout.

Linda

Tuesday, September 6, 2016

Middle Ground

Last week's batik scrap landscape is almost done--but not quite--which will be explained in the next blog. It has to do with VVHH's (very versatile handy husband's) part in it. Let's just say I'm not experienced with a drill, but he is.

During the delay, a UFO was pulled from the closet.


This was supposed to have been another 'ghost quilt'---meaning that outlines from the print fabric are extended into the background fabric with nothing but stitching (type ghost quilt in this blog's search box to see more about that process). But this piece wasn't working out as well as previous ones. The stitching just wasn't very visible. Why?

Because the background fabric was too much of a mid-tone. Not light or dark enough. Consequently, no matter what thread I tried, whether very light or very dark (I ended up using dark, as light was just plain wimpy), the stitching just did not stand out the way it was supposed to.


What to do? (Seems like I ask myself that a lot.)

Get out the fabric paint markers! They are so much fun, and have saved my arse more than once. Seven markers (yellow, brown, red-brown, red, pink, green and olive green) were pulled from the drawer and used in various combinations.


No, it's not looking so hot right now. But I'm still working on it, and hoping it will look okay when it's done.

So maybe two finished quilts will be posted next time. I hope so.

Linda

Wednesday, August 31, 2016

Batik Scrap Stash-Busting

Scraps are scraps, but for some reason batik scraps seem special to me. Maybe it's because they work in landscape quilts so well. So mine have their own drawer, where they're sorted by color family.


After six years, the drawer is full. Time to do some batik scrap busting.

 Strips were cut, some remaining straight-edged (many were from leftover binding) and some quickly given a wavy edge with the rotary cutter.


For a sky, raw-edge strips of purple, pink, red-orange and yellow-orange batik were glued (edges only) to a piece of batting (which had already been fused to a backing fabric), each strip slightly overlapping the one above it.

Then came some mountain shapes, then strips for water. Last, a wider yellow-gold strip was glued down for beach.

Sailboat fabrics were trotted out for auditioning. Paper-backed fusible was applied to the wrong side of the chosen boats before cutting them out.

One edge satin-stitched; lots more to go.
All strip edges were quickly stitched down with Superior clear Mono-Poly on low tension.

Deciding to satin-stitch the raw edges of the sky and mountains, I chose several colors of 40-weight polyester thread (Isacord) for the top and a 100-weight polyester (Invisifil) for the bobbin. 

Using a dense (.35 stitch length), a medium-wide (5.0) zigzag stitch, a size 14 topstitch needle and the open-toe dual-feed foot, I spent two pleasant afternoons covering raw edges at a moderate speed. Not a single thread broke or bird-nested.


This area of the water was accidentally shorted on fabric. Enough batting showed through that I didn't trust the satin-stitching to cover it. What to do?

Easy. (This whole project is easy!) Just cut out another piece of fabric and glue it over the area. Here you see it before the raw edges were stitched down:


Also, see that all-too-obvious vertical join? No problem there, either. It will be covered with the sail of one of the boats.

Oh, and what to do with the leftover trimmings from the strips?


Cut them up into little pieces for a confetti quilt! No waste here when it comes to batiks. Even the selvages get cut up. I think of these little bags of confetti as tubes of paint, and there's quite a palette accumulating in these two lettuce containers.

Next time, this scrap project will be a finished landscape quilt.


Moving on to some news from the 2016 Kentucky State Fair: The Visit received first place in the landscape/pictorial category. My first blue ribbon ever!

Type garrison quilt into the search box (on sidebar) to see posts about the making of The Visit.

Have a wonderful weekend!

Linda