Realizing that the ground under the trees looks a bit too neat for nature (I doubt there was ever lawn care in any natural forest, much less in Medieval times), I decided to put some brambles--wild shrubbery--in two or three places. Not enough to clutter the scene, but just to roughen it up a little.
Time to take Alison Holt's Machine Embroidered Woodlands off my bookshelf again.

 |
| New England Dawn, 2012 |

It went well, but, oh, how very scary it was to make the first shrub. The reason? This is free-motion stitching on a whole other level (or maybe I should say 'hole' other level, to be explained in a moment). For the first time in my life, I was sewing on...nothing. That's right, nothing. No fabric, no stabilizer, no netting, no anything....just air. It made me think of free-falling with no parachute. Here's why.

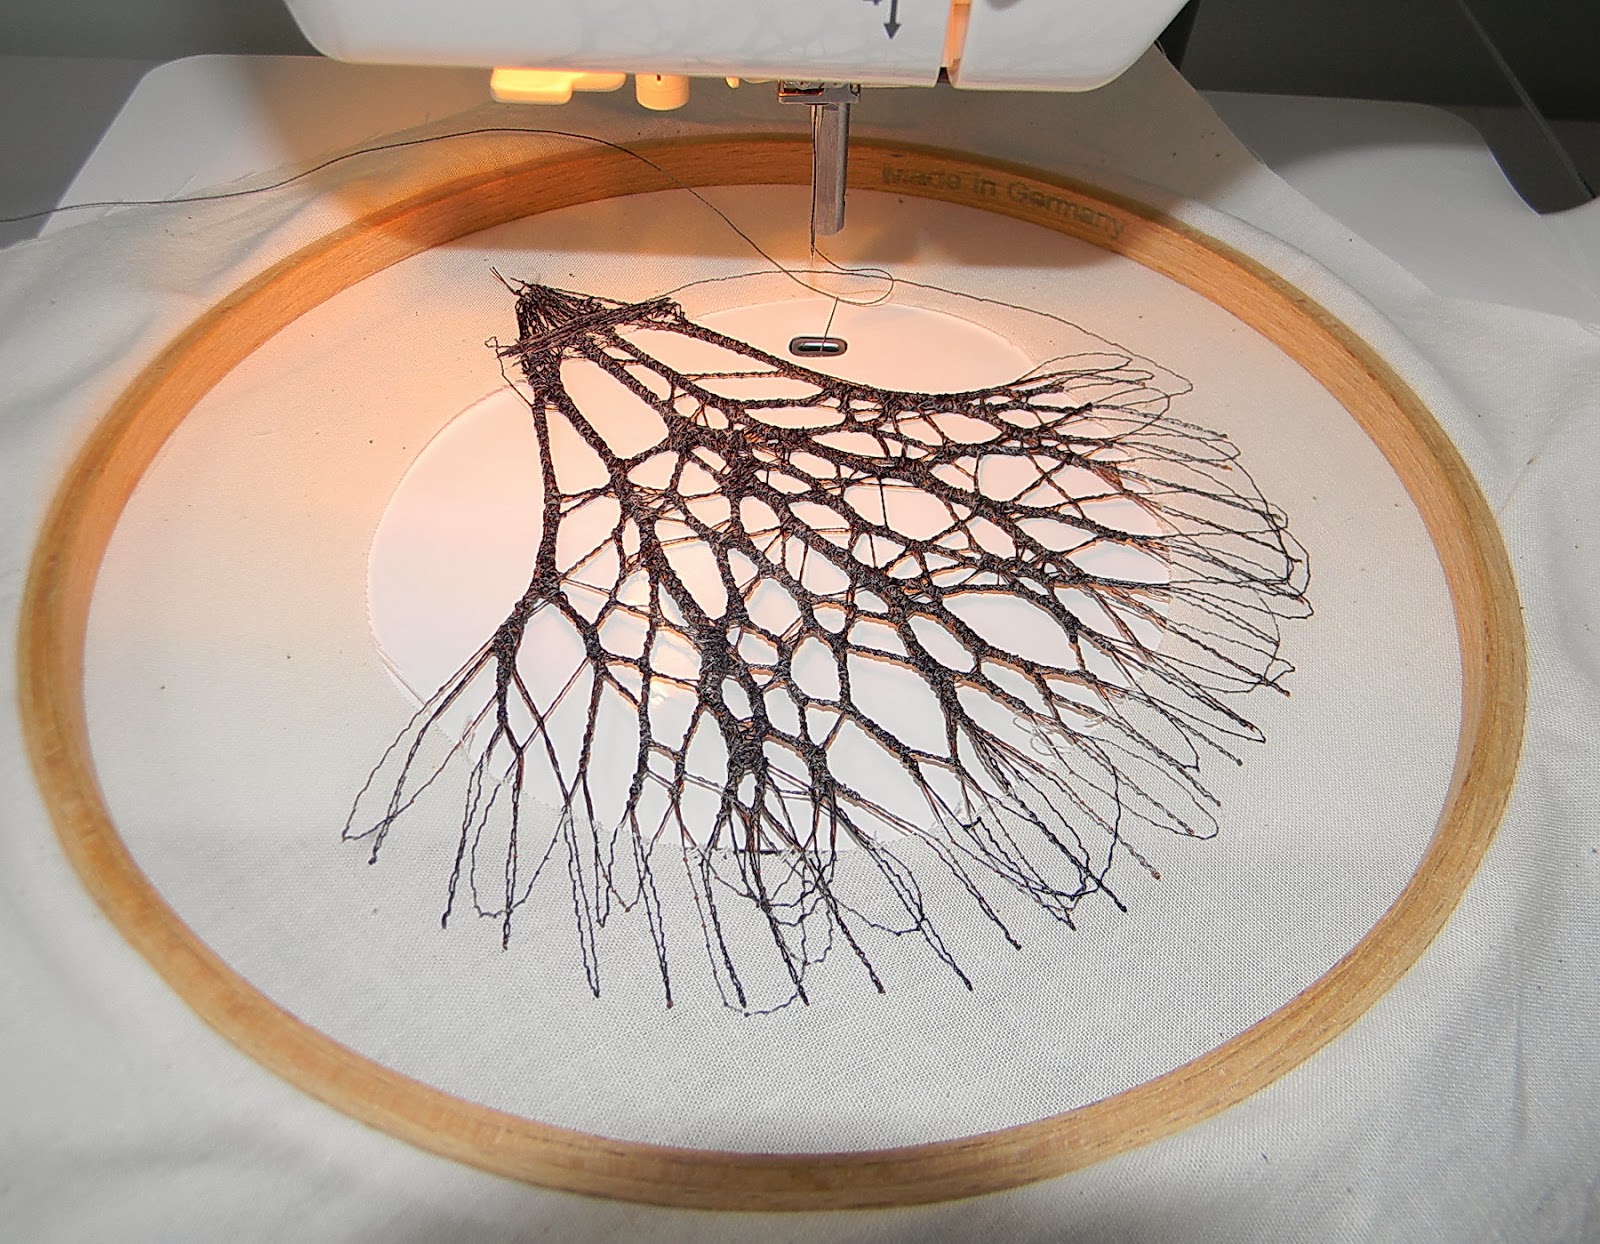
You start with a piece of muslin in an 8-inch hoop (hoop inside-up). Then you cut a 4-inch hole in the center of the muslin. That's right, a hole. Do you see where this is going?

Then you stretch the fabric tautly all around and screw the hoop tight. The hole will be another 3/4 inch or so larger in diameter now. Believe it or not, that's a good thing.

Then, with your feed dogs down (or up with 0 stitch length and a slippery mat over the machine bed), you slowly and steadily move the hoop while free-motion stitching straight lines in a fan shape from one side of the muslin to the other and back, stitching well into the muslin before returning to the starting point. The starting point will shift a little each time--after all, you can't keep hitting the needle on that same exact spot without eventually breaking it or your thread.
As long as your tension is well-balanced, it's amazing how seldom, if ever, the thread knots or breaks while stitching across the hole. (Always do a test first and make tension adjustments if needed.) If the thread does break, no big deal. Just cut the broken thread back to where it stops unraveling and start that line of stitching over. But don't start in the middle of the hole. Always begin at your starting point. I once started in the middle of the hole and broke my needle. (I still don't know how that happened but you can be sure I won't try it again.)
Next, change to a medium-wide zigzag stitch. (You're still free-motion stitching, so the stitch length stays at 0 if your feed dogs are up, under the mat.) Now, start zigzagging, fairly closely, up your straight-stitched lines and watch what happens:

When the trunks are finished, switch back to straight stitch. (This next part is even more fun that the last--yes, you should be having fun by now! :) Stitch up one of the main branches a bit and then start crossing over all of them, back and forth, willy-nilly, at angles (see next photo).

Now, switch back to your medium-wide zigzag and head up the first trunk. When you come to those crossed threads, angle out and start bringing some of them together the same way you did the trunks, narrowing your stitch width as you head toward the top of the trees/shrub. Again, the zigzag will pick up strands without much effort on your part, and if it misses any you want included, just stitch backward and then shift a bit to pick them up before moving along again. (It won't hurt to leave an occasional branch separate, as long as it's attached at both ends to other branches or trunks. You might want to strengthen it a bit with a narrow zigzag, though.)
Work as many branches and as much thickness or width anywhere you think it's needed. Then zigzag back over a trunk to your starting point.
Next, run some zigzag stitches sideways across the base of all your trunks, over the open space--not on the muslin, which you'll be cutting away. This last step ties the trunks together and keeps them from curling up on the ends after they're cut free.
Time to break thread!
And now you get to cut the trees/shrub out of the muslin! Don't be shy. Cut right through the threads, following the edge of the muslin circle (see below). The threads will contract a bit but they will not unravel--except at the tips, which only looks more natural.

Notice I forgot to tie my trunks together over the hole--I did it on the muslin! So to fix the problem, I simply cut out that little bit of muslin along with the shrub, trimming it closely, and then blacked out the white areas with a Sharpie marker. Cheating is allowed if it works. ;)
Now you can couch the trees/shrub by machine or by hand to your quilt. Cover the ugly base (let's face it, mine's a mess) with a section of grass or whatever is in that area of your quilt, and sew it down. Here's another one, pinned to the quilt for auditioning:

Actually, I made three of them this time, each with a different variegated top thread but keeping only one variegated thread in the bobbin for all. What's cool about this is you can reverse the trees/shrub if you want, and if the bobbin thread was different from the top, obviously you'll have another color choice in that same piece of embroidery.

Also, who says you have to leave these bare? You can add leaves or flowers, either with bits of fabric or by embroidering on the shrubs/trees after they're attached to your quilt. But I've come to love the skeletal structure of bare trees, as well as dead ones, which I used to think were bleak and depressing. No more. Every one of them has such character and is beautiful in its own way, and no two are alike. Which reminds me: no two of these embroidered trees/shrubs will ever end up alike, either. Which makes them all the more natural-looking.
Again, this project came from Alison Holt's wonderful book, Machine Embroidered Woodlands. It includes tons of machine-embroidery ideas and instructions, and plenty of photos. Her work is extraordinary and inspiring, so it's a joy just turning the pages.
Time to sign off and get some Christmas prep done. Hooking up here with Leah Day's FMQ Friday with her wonderful reader links, as well as Sarah Craig's Whoop Whoop Friday post and her many inspiring reader hookups. Here's hoping Leah goes through with her idea to make a king-sized bed quilt on a regular sewing machine in 2014...I would love to follow that! Sarah has just finished a gorgeous quilt and is sharing photos.
Have a great weekend, and for those of you experiencing single-digit temps, stay warm!
Linda
And here I thought I had seen every way to make a bush - fantastic! I'm so glad I follow your blog, always learning from you. Thank you for sharing. I need to try this.
ReplyDeleteYou are more than welcome, it was so fun to share Holt's method. I hope you do try it, it's a fun break from quilting.
DeleteWhat a great idea for your quilt and I really like this technique. I'll have to look up the book.
ReplyDeleteThanks, LauraT
Laura, it's great and so are her other books. Enjoy!
DeleteWow I love this! I've tried lots of different approaches to thread painting but I've never even heard of doing it this way! So excited to try it out, thanks for sharing.
ReplyDeleteShannon, I hadn't either until this book, and it still strikes me as revolutionary! Hope you do try it. It's hard to go wrong, and it's so fun to watch the piece take shape.
DeleteLinda, this looks so scary I think I need to lie down. The finished effect is fantastic.
ReplyDeleteMuv, thanks for the biggest laugh of my day! It's such a fun thing to do after that initial fright.
DeleteAnother book to buy. It's amazing what one can do with machine embroidery. Thanks for sharing - I always like to read your quilt process.
ReplyDeleteThank you for reading, I love to share the things that work (and don't work) for me. Oh, you will love this book.
DeleteThank you for this wonderful tutorial. Your instructions are perfectly clear and the outcome is very cool! I am definitely bookmarking your site!
ReplyDeleteOh good, I was a little nervous about whether this would be as clear as I'd hoped. Thank you!
DeleteDid you hear me screaming, "OMG"........what a fantastic way to create trees/branches/bushes. Thank you so much for sharing this method and the book!
ReplyDeleteBTW, I'm a huge fan of your work.
Have a great Christmas and New Year!!
Rhonda, that's pretty much the way I reacted when I found this in Holt's book!! So glad to share my experience with it--I think she's an embroidery genius. Thank you for your comments, they make my day. You have a wonderful Christmas and 2014 as well!
DeleteThanks for this tutorial; this takes my machine use to a higher plane. It's wonderful.
ReplyDeleteOh hey, Marly, I found you! LOL I thought I had accidentally deleted your comment....so glad that wasn't the case! Yes, please try Holt's method, it is truly liberating as to what we can do with our sewing machines. And thank you so much for joining my blog!
Delete