Friday, May 31, 2013

Lida-Loony

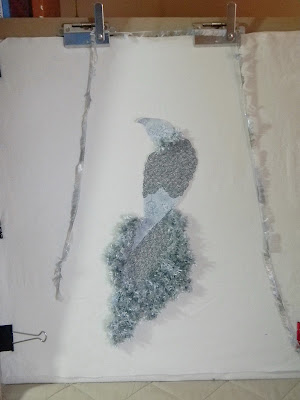
At last, some progress in the new quilting studio. Lida the bird has decided to (mostly) drop her diva-ish ways this week and cooperate. Between Floriani thread and plenty of little alcohol pads to periodically clean the fusible-web goo off the needle (always taking the needle out first), she's been transformed from view A to view B:


View A
View B


She has no eyes yet, and won't have until after she's attached to her free-motion quilt, Lida Luna--untrimmed and waiting on the design board (we don't have the new design wall finished, but my very versatile handy husband--VVHH from now on--is working on it):


Lida's beak will probably be painted either silver or a pearlescent white; otherwise it won't show up all that well against the sky.

The transformation wasn't exactly a cakewalk. There were hitches. The first issue was hand-tying knots in Floriani thread, which I'd never tried before. (I couldn't trust the lockstitches at the beginning and end of each row, most of them being right at the edges of Lida's body, which will soon be closely trimmed away from the stabilizer.) I used my usual hand-tying process, a reef (square) knot, the same configuration you use to keep your shoelaces from coming untied. A knot you can count on.

The joke was on me. While I was working on the second knot,
I literally watched the first knot come loose. I couldn't believe it! Square knots have never failed me with Isacord, Superior and YLI poly, Invisifil, or good ol' Coats & Clark--or my shoelaces. Not ever. However, Floriani embroidery thread is the most slippery thread I've ever used other than mono-poly. (UPDATE: I've since discovered that I may have all along been tying the 'reef' or 'square' knot wrong--oops--still, this thread is slippery enough that, as I said, it is the first to have made knots that I've ever actually watched come untied. END OF UPDATE.Vexed (and somewhat indignant), I re-tightened the errant knot and then pulled out one of my favorite weapons--Fray Check. Oh yeah...take that, Floriani!! From then on, every knot got saturated with the stuff. And so far, they're all staying put. The great thing about Fray Check, besides checking (stopping) fraying, is that it's totally undetectable after it dries.

The second hitch was something already mentioned above, which is having to trim Lida away from the stabilizer. That's because in my anxiousness to get started, I accidentally pulled out a scrap of medium-weight Pellon interfacing instead of the scrap of tear-away stabilizer I'd meant to use. When the sinking feeling dawned on me halfway through these lines and rows that the stabilizer was handling more like interfacing, I tested a corner of it. Sure enough, it tore somewhat easily in one direction, but not in the other. At that point, Lida was beginning to make me loony. But I wasn't about to rip stitches and start over. Plugging away was the only option. So a close and cautious trim with the scissors will have to do. Once Lida is satin-stitched onto the quilt (over some batting to puff her out a bit), her edges should be invisible; otherwise, fabric markers can be used to touch up any white areas that might show through. Lesson learned, however. From now on I'll check the tear-ability first to make sure it's the right stabilizer. Duh.

Hooking up to Whoop Whoop Fridays, where Sarah has just finished a really cool project with the kids at her church. Be sure to look at some work by the folks who've hooked up below her post, too.

Also hooking up with Leah Day's FMQ Friday. Today Leah was in jail---no, not for real! Just read it. Very entertaining and encouraging.

And happy (almost) June!

Linda

Friday, May 24, 2013

Breaking the Ice

After posting photos of the new quilting studio last week, I was anxious to get up there and start work. However, I'd forgotten one 'minor' detail: the bedroom from which much of this equipment and all these supplies came was now a disaster. Granted, it was a disaster with a lot more space, but it was still a disaster. There were areas that had been so blocked in before, that dusting and vacuuming had become difficult if not impossible. Also, there were things I had modified for quilting and storage that could now go back to their original purpose. Until this old space got cleaned and reorganized (not nearly as fun as prepping the new space), it would be an unpleasant sight to go to bed to and especially to wake up to (pardon the prepositional ending). So mostly, that's what's been happening this week.
 
The bedroom went from these two views...


...back to this (minus the curtains I still need to wash and re-hang):


Ok, yay. I mean, YAY, "whoop whoop!" as Sarah would say! (And I've gotta paint that old chair something other than blue.) But I'm nothing if not stubborn, so even before any of that happened, I thought, all right, I'll just do one little thing in the new studio and then I'll get to work in the old bedroom. I trotted upstairs, sat down at the sewing machine and looked around--and realized that after all of this anticipation, work, and reorganization, I was feeling intimidated by the new space. What?? This was unexpected, a splash of cold water in my face. It was as if the new studio was saying, "Ok, kiddo, let's see what you can do, now that you've got me!" Yikes. So, pretending to be unconcerned, I pulled Lida the bird out to work on--and then remembered that, in all the hubbub with moving, I hadn't gotten around to buying the shiny black thread needed to outline her feathers. Crap. Back Lida went, into her plastic bag.

Nor did I feel ready to unroll the lizard mandala quilt-top or the lake quilt-top (and I know better than to force myself to work on something that isn't jiving with me at the moment). Looking around, my eyes lit on a box I hadn't opened since it was purchased over a year ago--the circular sewing attachment for my machine. Immediately, I thought of the fat quarter I had used a while back to experiment with Shiva Paintstiks. It had rubbings of sycamore and dogwood leaves from my front yard AND a circular design in the middle--a rubbing from a ceramic, Zodiac ash tray given to me in my smoking days of the 1970s. Circular...perfect! I used a variegated YLI thread in the top, and a solid Isacord in the bobbin. They stitched beautifully together.


 It's hard to tell without clicking on the photo, but the attachment worked great. It's not free-motion stitching, of course, but the rest of the piece will be.
 
The main thing is, this simple exercise not only taught me something new, it also broke the ice. No more intimidation!
 
In the meantime, my husband has been busy adding some things to the room. (I'm starting to think this should be his blog. :) First is the little table he made to fill in the space to the left of the sewing table:  


It turned out perfectly flush with the sewing table and the big maple table behind it. His measures are never off; he is amazingly thorough and precise. I know, I'm very fortunate! The next thing he did was frame a piece of pegboard and hang it above the cutting table. Here's the weird thing: just like the fat-quarter shelves, the yardage shelves and the thread shelves, the pegboard turned out to be exactly the size that was needed, just large enough for everything to fit. We had no way of knowing this beforehand. It just worked out, like the proverbial pieces of a puzzle falling into place. Then again, I don't believe in coincidence.
 
 
Then he hung the wall gecko that my son and daughter-in-law gave me for Mother's Day. As I mentioned in my last post, lizard is my totem animal. It symbolizes The Dreamer in some Native American folklore, so it seems very appropriate to have her mounted over the drawing table, where dreams becomes designs and designs eventually become quilts.
 
 
All that's left to do now is put up a design wall. We're working on putting materials together on the cheap for that--styrofoam insulation panels, corrugated board backing, and flannel covering. Meanwhile, I bought my shiny black thread and will resume work on Lida Luna, so there should be some actual free-motion quilting to show next time--it's been too long.
 
Hooking up here with Leah Day's new blog entry on FMQ Friday, 'Stitch for Fun, Not Perfection.' Good advice for me and I'm sure for many other quilters, as well. When you finish reading that (and viewing her amazing Duchess Reigns), be sure to look at the other quilters who are hooked up there; you'll see some amazing work. They never fail to inspire me. As do the hookups at Sarah's Whoop Whoop Friday blog. Sarah has just reorganized her quilting studio, too, and judging from everything she's quilted this week, she was not intimidated by it AT ALL. (I'm following her example from now on.) Check it out!
 
Linda


Friday, May 17, 2013

Everything Old Is New Again

The new quilting studio is (except for a design wall and some pegboard and a little table my husband is building) FINISHED! After 5 grueling but oh-so-fun days of arranging and organizing this wonderful space my very talented and hardworking husband has labored so hard to refurbish, I can actually start working up there tomorrow (between washing the loads of laundry I ignored all week). Maybe Lida the (Diva) Moonbird will finally get some feathers! Anyway, for those of you who expressed your congratulations (thank you!) and for everyone who saw the old studio (bedroom) photo, here are some shots I took this morning of the new studio (including the adjoining bathroom :). But first, the 'before' shot, on the left:


What strikes me most about this room is that probably 95% of what's in it was given to us over the years, bought at thrift stores, or has been repurposed from its original use years ago.
Our younger son's old CD shelves are now my fat quarter shelves. (And I adopted the old boom box he abandoned.) The Singer cabinet holds my late mother-in-law's pride and joy, her 1962 Singer Slant-o-Matic 503, which is now Machine #2 in the room. The Martha Washington sewing cabinet was my grandma's and then my mom's.

This next shelf unit was the toy cubby that my husband Mark made for our sons when they were babies. The computer desk was my aunt's and then my mom's. The wooden wine box holding the quilting magazines is from our older son's wedding reception last year.


And here we have our younger son's old Hot Wheels shelves, also made years ago by my husband Mark:


And remember this little guy? I picked him up at Habitat Restore, and who woulda thunk it...he wound up fitting right in the corner between the bathroom door and the attic door! Not only that, but he holds all of my larger yardage--every single piece I had. Tell me he wasn't meant to come home with me...


(The little 6-drawer cabinet on top of him was a thrift store find for $5. And it's green!! As is the old paint paddle I used to shim the bottom of the shelf unit and make it lean against the wall instead of leaning outward--which it started to do after I loaded it with fabric :).
 
The next photo is the cutting and pressing station. The rulers will eventually hang on a piece of pegboard, and I can use my thread rack for thread again. I've had the cutting table since 1986 and the chiffarobe was our younger son's dresser as he grew up. The cutting table extends another two feet on the left, but is in its convenient drop-down position here.


This shows a part of Machine #1. Mark is building a table that will fit in the space to the left of the white sewing table. My aunt gave me the maple table in 1972, and Mark refinished it. The chair was $20 at Habitat Restore, the basket on the table was $2. The pie basket on the floor holds batting and flannel scraps, and cost $5 at an estate auction 30 years ago. The magazine rack, which holds books on stitching and the machine manual, once belonged to Mark's grandparents.


 Machine Number 3 fills in the corner at the top of the stairs, the only area where everything is fairly new. This one is used mostly for piecing and embroidery/thread painting (Machine #1 is generally tied up with quilting and Machine #2 is reserved for clothing and more industrial work). That's another $20 chair from Habitat Restore. They had about 30 of them.


I enlarge sketches and paint fabric on this drafting table, made by Mark for our older son during his high school years. My old cutting mat fits perfectly! Due to the new carpet and the proximity of a bathroom up here, I'll probaby rig a painting setup over the tub from now on, where, as mentioned in my last post, I can just rinse the whole mess down the drain.


The bathroom is a bathroom, what can you say, but Mark worked very hard to restore the tile and repaint the walls and woodwork. The cabinet and tank-top shelf was built by him years ago. The pitcher and platter and the candle holder are recent thrift store finds. All I need is a candle.


 In the niche near the bottom of the stairs I've put one of my Mother's Day gifts from our older son and his wife. Lizard is my animal totem, and this wall gecko is just beautiful. This may not be her permanent home, but it will do for now.


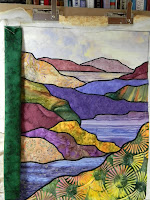
Which is a good segue into what may be the project that follows Lida Luna. I started a lizard mandala quilt almost two years ago and then put it away. Re-inspired by seeing Suzanne's serpent quilt at her Gardener-Quilter blog, I pulled it back out of my stash, along with another unfinished quilt top (a lake scene), and am hoping to get both of these sandwiched and free-motion quilted shortly.


Leah Day, my favorite blogger, is asking what we've been up to this week, so I'm hooking up to her newest blog entry along with several of her talented readers. Also hooking up to Whoop-whoop Friday on another very fun blog I just recently discovered, where Sarah has been doing some amazing organizing of her own this week!

Holy cow, it's way past my bedtime. Goodnight, and happy quilting (or organizing)!

Linda

p.s. A shout-out to the great songwriter Peter Allen for his composition, Everything Old Is New Again, from All That Jazz

Friday, May 10, 2013

Divas and Digs

I wish there were more progress to report on Lida Luna, but Lida the moonbird is proving to be Lida the Diva. I was so sure that metallic silver thread, bright and blingy against the medium-gray fabric of Lida's shoulders, would be the best choice for the scallop stitching on her feathers. Wrong-o. Unless the light shines on it at one particular angle, the silver thread doesn't even show. The scallop stitches (one of the rare instances I'll be using a built-in machine stitch on an otherwise free-motion landscape quilt) will have to be black, and fairly shiny.

The good news is, after 3 separate backorders totaling a 6-week delay, the carpet is being laid in the new studio this morning. A sort of oatmeal shade that goes by the inexplicable name of Lovesick (who names these colors, and what are they thinking?), it will be a nice, neutral, light-reflecting backdrop for all those colorful fabrics, paints and threads. Never have I been so happy to hear hammering and stapling at 8:00 a.m. For a little perspective on just how happy, here's a photo of what I've been waking up to every morning for the last few months:


That's because my 10' by 12' bedroom is also the studio. It started out lovely and non-cluttered, but that was before a second sewing machine, four drawer units, more design boards, and several tubs of fabric were added--all necessary and well-organized, but increasingly invasive. So much so, it's really begun to cramp--make that kill--any real creativity. Several times lately, I've walked in here to work on something, only to turn around and walk right back out. I'm a bit of a neatnik, after all, and this is the kind of scene that can send me over the edge. The only thing that's kept me from turning into a raving lunatic is knowing that this will all soon change. Thanks to my very handy and hardworking husband, and the son who moved out last September, by lunchtime today there will be, for the first time in nearly 40 years in this house, a room dedicated to nothing but designing, quilting, embroidering, and fabric painting. Oh hallelujah, glory be, and happy day!


During renovation (old carpet still in place)


There's a bathroom up there, too. Aside from the obvious advantage of that, I'll be able to paint fabric right over the bathtub and then rinse away the mess. For a neatnik, it doesn't get much better than that!


Tomorrow, after a bribery brunch (just kidding, they'd have done it for nothing), my two wonderful, strong sons will move the heavier items up to my new digs. Then comes the fun part: arranging and organizing. And last but far from least, quilting!

To read about someone who is making real progress with her free-motion project(s), head over to Leah Day's FMQ post. For added inspiration, check out the other blogs hooking up with her at the end of her post.

Also hooking up with Sarah for Whoop-whoop Friday, because she asked what made us dance the happy dance this week. If a new quilting studio doesn't qualify, I don't know what does. And check out all of her hookups!

And here's wishing a happy Mother's Day this Sunday to all of you moms!

Linda

Wednesday, May 1, 2013

Color Me Crazy (and Sometimes Crazy Works!)

Last week I was in a bind, so to speak, over what color of binding to use on my little 15" x 22" landscape quilt (see Voting Day in the Stew-dio). I asked for 'votes,' and several kind folks chimed in with their favorites of the three colors under consideration, all of which I had presented by photoshopping skinny borders onto a photo of the quilt. Counting the blog responses, my husband's choice, and the votes on the Facebook page, green got 7 votes, magenta got 6 (along with several second-choice votes), and black got 4. (Warning: you're probably going to get sick of seeing this quilt, but as any quilter knows, the point here is noticing what effect the potential binding colors had on the quilt colors.)

After the votes, I was still torn, darn it!...so I went on and pulled fabrics in all 3 color families. So much for that "saving time and cuticles" theory ;). Anyway, that was where magenta fell out of the running, because it turned out that the closest colors I had were a deep red-violet (left) and a medium rose (right). The red-violet immediately brought all the purples too far forward (which one voter had said about the magenta) and the rose just looked wimpy.


Then I auditioned the black fabric at left. Amazingly, instead of simply complimenting the black satin-stitching, it visually sucked a lot of the deep greens out of the quilt! It also looked a bit stark and lifeless against that pale sky fabric.


 So out came the greens, below. Being a landscape quilter, I have lots of greens--batiks, leaf prints and tree prints. And while the dark- and medium-greens looked nice, they didn't make the quilt 'pop' as much as I'd expected.


That is, until I saw this next one, where just for the heck of it (you know how you start getting desperate and reckless after a while?) I'd thrown a somewhat wacky mottled yellow-green onto the design board. Mind you, I was only comparing these two greens at first, for the potential use of one or the other.

But something clicked. I took the dark green off, and tried the mottled green by itself (no photo of that, aren't you glad? ;). But, no go. It looked too busy and it made the prints in the quilt recede and blend. So I put the dark green back on, and then started moving the two greens around to see which one looked better on the sides, which one looked better next to the sky, and which one complimented the print in the foreground. The sky looked better against the mottled yellow-green; everything else looked better against the dark green. But putting the dark green on the sides and bottom, and the yellow-green on the top only, just looked weird--like I had run out of dark green.

 So below is the solution I came up with--and the finished quilt. Green not only won, it triumphed, with not just one shade but two! Fence sitting is a habit of mine that can drive me crazy, but in this case it actually worked out...I think. Maybe we should vote? Just kidding! :) What's done is done.
 
 
Oh, and I promise never to post another photo of this quilt on this blog again. :)

Linking up here with Leah Day's FMQ Friday. Check it out; she's got 3 beautiful free-motion projects going AND, come Wednesday, will have her newest Craftsy class, Free Motion Fillers Volume 2, up and ready!

Linda

p.s. Thanks again to everyone who voted. I'll be glad to return the favor any time!